Zoom Recording Help
This article applies to: Zoom
In general:
- Students can only create Cornell Zoom recordings in local storage (not Zoom Cloud recordings).
- Faculty and staff who attend a meeting can create recordings in local storage if the host has given them that permission.
- Faculty and staff who host a meeting can choose local or cloud storage for their recording.
Local Recording
This is the only option available to students. It it also available to faculty and staff.
The following link will take you to the vendor's help documentation:
The following sections are the most useful.
- Start a Local Recording
- Stop or Pause a Local Recording
- Allow a Participant to Record
- Recording Location (Accessing Your Recordings)
Cloud Recording
This option is available to faculty and staff who host or co-host a meeting. It is not available to faculty and staff attending meetings, nor to students.
Cloud recordings are automatically transferred to Cornell’s Video on Demand service. You will be able to access your meeting recordings there; you will not be able to access them through Zoom's web portal. Cloud recordings are not retained indefinitely and are auto-deleted after 120 days. The VOD is the long-term repository for Zoom cloud recordings (beyond 120 days).
Allow a Participant to Record
The meeting host can record their own meetings. The vendor’s documentation on Allowing a Participant to Record covers this topic. The vendor's page refers to local recording, but the same steps work for cloud recording.
The meeting host can also grant one or more participants recording privileges, but participants will only be allowed to record locally.
Start, Stop, or Pause a Cloud Recording
While in a meeting:
- Click in the Zoom toolbar.
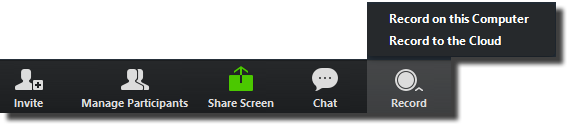
- Select . Your recording will begin.
- To stop recording, click or .

Once the recording has been stopped, Zoom will process the recording, then transfer it to Cornell’s Video on Demand service. You'll get a message from Zoom telling you that your recording has been transferred, but it might not be available in Cornell's Video on Demand service immediately.
Accessing Your Recordings (Overview)
See our Video on Demand site for information on common tasks. The most frequent question is "how do I download my recording," so we summarize that for you here.
- Log in to the Video on Demand service.
- Click My Media.
- Click the title of the desired video.
- If you see Download (next to Details and Share), skip to step 5 below. If you do not see a Download button, follow the lettered steps here:
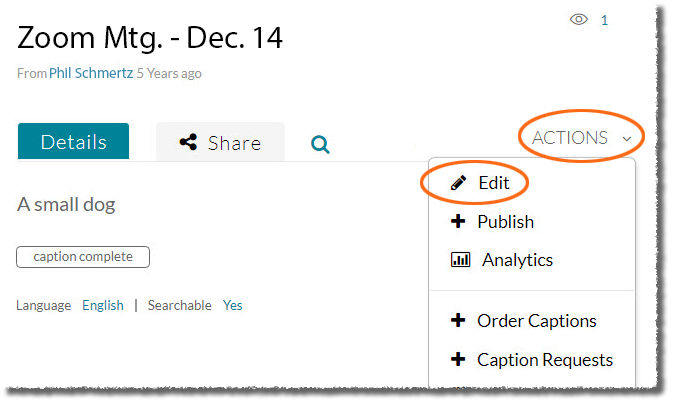
- Click , then select .
- Click .
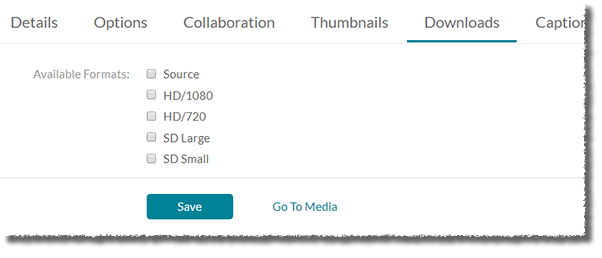
- Select as many versions (sizes) as you want to make available, then click . Select Source for the highest quality; the options are in order from highest quality to lowest. Remember that the higher the quality, the larger the file.
- Click . You will now see Download next to Details and Share.
- Click . You'll be shown a list of format choices (based on your selection earlier). There may be only one format. That’s okay.
- Click next to the desired format; the sources are in order with the highest quality (and largest file size) first. Your download will start.
Note: When downloading a Zoom Cloud Recording, the file downloads without the .mp4 extension. As a workaround, alter the file name to add .mp4 as the file extension. This issue does not impact video playback on Video On Demand, only playback of the local file when downloaded.
If you plan to share your recording with others, see our Share Your Media article for details.
If you want others to be able to view your recording but not download it, see the Enable or Disable Downloading section of our Share Your Media article.
Comments?
To share feedback about this page or request support, log in with your NetID