Record from a Webcam
Use Video on Demand to record video from a webcam on your computer.
This article applies to: Video on Demand
In addition to being able to upload video files to Video on Demand, you can also record videos directly using your webcam.
- If necessary, log in to Video on Demand.
For best performance, CIT recommends using Chrome with the Webcam Recording feature.
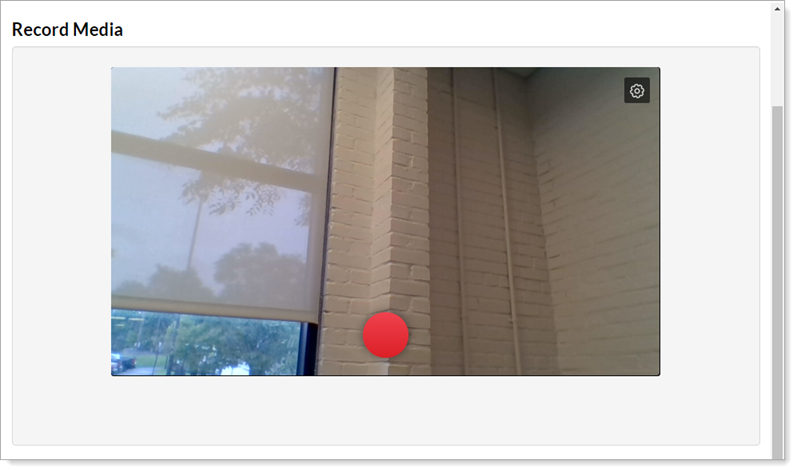
Click , then from the menu click .

- The Record Media page will open. If you are prompted to allow kaltura.com access to your camera and microphone, click . (For questions about how to use your webcam, check the webcam’s documentation or online help.)
To change camera or audio settings, click the Settings icon (a gear in a black square), then:- To change which webcam is used for the recording, click Camera, then choose a camera from the list.
- To change the audio device used for the recording, click Audio, then choose an audio device from the list.
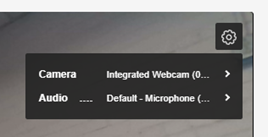
The Record Media settings will only show camera and audio hardware installed on your computer. Consult your operating system or computer’s documentation for information on installing additional video or audio devices on your computer.
- To start recording, click the Record icon (a red circle). Once recording starts, the video displays the recording time in the video area.
- To stop recording, click the Stop icon (a small white square) next to the recording time. Use the typical video player controls at the bottom of the video preview to rewind to the beginning, go back 10 seconds, change the playback volume, change the playback speed, or display the video fullscreen.
- After reviewing your webcam recording:

- To save the webcam recording to your media in Video on Demand, click Use This.
- To save the recording locally to your computer, click Download a Copy.
- To re-record your webcam recording without saving the current version, click Record Again.
- If you are saving the recording to your media in Video on Demand, an information form opens. Type details about your recording into the Name, Description, and Tags fields. (Only the Name field is required.) Choose one of the radio buttons at the bottom to make the recording Private (only you can see it), Unlisted (only those with a link you provide can see it), or Published (visible to all who have rights to view it). These details can be edited later by opening the video from your My Media page.
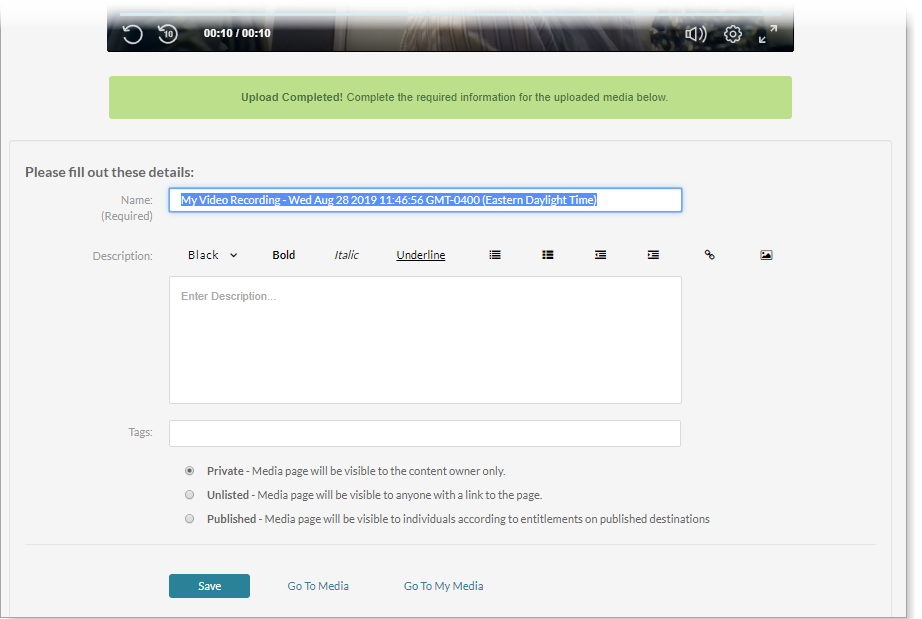
- Click (at the bottom of the form) to save the details. Then you can:
- Click to open the recording you just made.
- Click to return to your My Media page.
If your media is still converting, you will see “Media is being processed” or “This media is still being converted.” Once the media has finished transcoding, this message will no longer be displayed.
Support Contact:
Cornell IT Service Desk
Normal Business Hours: Monday-Friday, 8am-6pm (Eastern Time)
Open a ticket (24x7 support)
Emergency Service Disruptions: After Hours Support
Comments?
To share feedback about this page or request support, log in with your NetID