Configure Scanner for Perceptive Content
Scanning profiles and capture profiles define the behavior of the scanner in connection with the Perceptive Content (formerly known as ImageNow) client.
This article applies to: CU Electronic Student Records , Enterprise Content Management
Introduction
You can configure a scanner for any Perceptive Content client computer. Scanning profiles and capture profiles define the behavior of the scanner in connection with the Perceptive Content client. You must have the Perceptive Content client installed before you can configure the scanner.
Release a Scanner Token
A scanner token associates a particular workstation with a particular scanner. You will need to release the scanner token in various situations: to move a scanner from one workstation to another, to use a different scanner on the workstation, or when a workstation is no longer in use.
To perform this procedure, the user will need to have management privileges, be a Manager, or be the Owner.
- On the Perceptive Content toolbar, from the menu, select .
- In the Perceptive Content Options dialog box, in the left pane, click .
- On the right, under Scanning Profiles, click .
- In the Device Manager dialog box, select the device to be deleted, then click .
- The following message appears: “If you delete the device, the associated scanning profile will also be deleted. This may also cause problems with some Capture Profiles. Are you sure you want to delete the device?” Click .
- The following message appears: “There are no more devices using the token for ‘CaptureNow - x.’ Would you like to release the token?” Click . If the token does not release automatically, contact the IT Service Desk to have the token released using the INTool command.
- Log off Perceptive Content.
Install a Scanner
The scanner token from any previously installed scanner must be released before a new scanner is installed. See Release a Scanner Token above.
- Download the necessary PaperStream IP (TWAIN) driver you need: http://www.fujitsu.com/global/support/products/computing/peripheral/scanners/fi/software/
- Quit any other applications that are running on your computer.
- Run the file you downloaded in step 1. Installation usually starts automatically after self-extraction. If it does not start automatically, in your Downloads folder you'll find a Disk1 folder. Inside Disk1, double-click .
- Follow the instructions in the Installation Wizard to complete the installation.
- When the installation has completed, go to -> to confirm that the version of “PaperStream IP (TWAIN)” is correct.
- Connect the scanner into the workstation by plugging the USB cable into any available port.
- If the Found New Hardware wizard appears, follow the instructions on the wizard pages. (If you downloaded the newest driver successfully, the New Hardware Wizard will probably not appear. That's okay.)
- Use the Windows Device Manager to verify that the scanner name appears in the device list under imaging devices.
- If it does not appear, make sure the scanner is turned on and check USB port connections.
- If a yellow question mark appears next to the name of your scanners, the driver did not install properly. Check to be sure that you have the correct driver properly installed.
- If the scanner name appears (without a yellow question mark), the scanner has been successfully installed.
Create a Scanning Profile
Scanning profiles store information about the type of scanner you are using along with scanner-specific features such as paper size, color mode, and image processing filters.
Scanning options like Blank Page Detection and Barcode/Patchcode Detection should be set in the Scanning Profile not in the TWAIN dialog. Having the settings in both places will cause unpredictable behavior.
To create a scanning profile, you must have Write permission for the installation driver and the user's data folder.
- On the Perceptive Content toolbar, from the menu, select .
- In the Perceptive Content Options dialog box, in the left pane, click .
- On the right, under Scanning Profiles, click .
- In the Scanning Profile Manager dialog box, click .
- You will be prompted to find and assign a token. Click to permit a search. Click to assign an available token.
If no tokens are found, contact the IT Service Desk. - In the Scanning Profile dialog box, on the tab, perform the following steps to create a new scanning profile:
- For Name, enter a unique profile name.
- For Description, enter a short description.
- From the Device list, select the desired scanner.
- On the Properties tab, choose the options you want.
(Depending on the type of driver you are using, the Scanning Profile dialog box may have additional tabs.) - Click three times to close all the dialog boxes.
Create a Capture Profile
Capture profiles are the bridge between the hardware and the software. They store information about how you want to bring the file in (from a file, scanner, or Perceptive Content printer) and where you want it to go (Application Plan).
Mode Choices in Step 5 Below
The two modes are Single and Batch.
Single is used for automatically linking student data to single documents imported with the Perceptive Content printer or one-off documents. An Application Plan ties Perceptive Content to another application, such as PeopleSoft. If you already have an Application plan, after step 5 below, select the department's plan on the Single tab. If you do not yet have an Application Plan, the unit's administrator should submit a Remedy ticket for SSIT Business Applications to have one designed.
Batch mode is used for processing a large number of documents that the user will link to student records sometime in the future.
To create a scanning profile, you must have Write permission for the installation driver and the user's data folder.
- On the Perceptive Content toolbar, from the menu, select .
- In the Perceptive Content Options dialog box, in the left pane, click .
- On the right, under Capture Profiles, click .
- In the Capture Profile Manager dialog box, click .
- In the Capture Profile dialog box, on the tab, perform the following steps to create a new capture profile:
- For Name, enter a unique profile name.
- For Description, enter a short description.
- From the Source list, select , , or .
- For Mode, select either or .
(See Mode notes above.) - If the user knows that their documents are to be placed automatically in a workflow, set Send To.
- Click , , and to save the Capture Profile and to close all the dialog boxes.
Assisted Scan and Custom Scanning Profiles for Better Scans
The PaperStream IP driver is used to customize the scan settings for Fujitsu 7000 series scanners, like the ones we use for Perceptive Content. The interface allows users to make use of “Assisted Scan,” which walks them through rescanning problematic documents. It also provides tools for more experienced users, allowing them to create custom scanning profiles for regularly encountered problems, like colored backgrounds on documents, or very lightly printed documents.
Turn On the TWAIN Dialog for Users
This option may already be turned on, depending on what Properties you set when creating your scanning profile (step 7 in that section above).
Follow this procedure to check your setting and/or turn the TWAIN dialog on now.
- On the Perceptive Content toolbar, from the menu, select .
- In the Perceptive Content Options dialog box, in the left pane, click .
- On the right, under Scanning Profiles, click .
- Select your scanning profile, then click .
- Put a check next to .
- Click OK to close all dialog boxes.
Check your settings by starting a test scan: From the dropdown, select the profile for which you just turned on the TWAIN dialog.
Use IP TWAIN to Improve Scanning
Scanning options like Blank Page Detection and Barcode/Patchcode Detection should be set in the Scanning Profile not in the TWAIN dialog.
Having the settings in both places will cause unpredictable behavior. See Create a Scanning Profile above.
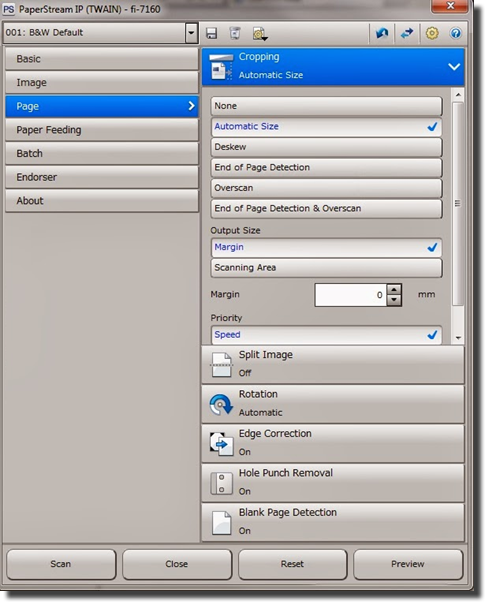
Use TWAIN options to set features that are NOT available in the Scanning Profile, such as Assisted Scan and Cropping.
This is the basic window that you will see when the TWAIN interface first launches. In the upper-left, users can, from the dropdown (which, in this image, reads 000: Current Setting), select any of the default or custom-saved scanning profiles. 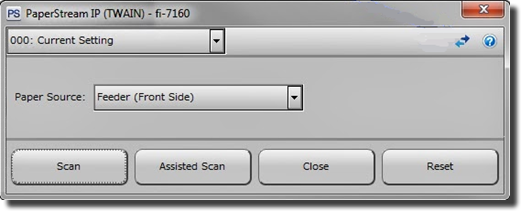
Assisted Scan
When users get a problematic scan, the first option is Assisted Scan, which provides a preview on the left and several variations on the right from which the user can select a better version. 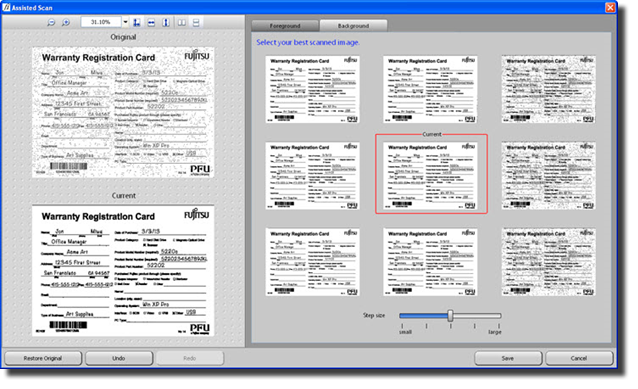
Advanced Options
If Assisted Scan couldn't correct the problem (such as a transcript with a colored background), click the (next to the help icon) near the upper-left corner of the dialog box. This will display a number of advanced controls. 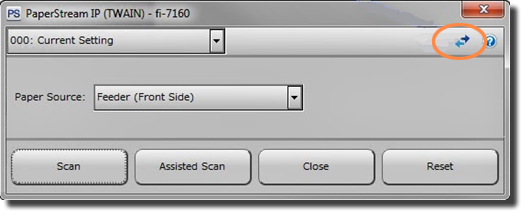
Click to get a first look at the digital image. The preview will change as you modify the settings, so you can see if your adjustments are on the right track. This often takes a bit of trial-and-error experimenting. If the problem is one you run into with any frequency, click (the disk icon) when you are satisfied with your settings and choose a descriptive name (like “Yellow Backgrounds”). This new profile will now be a choice in the upper-left dropdown.
Example: Colored Backgrounds
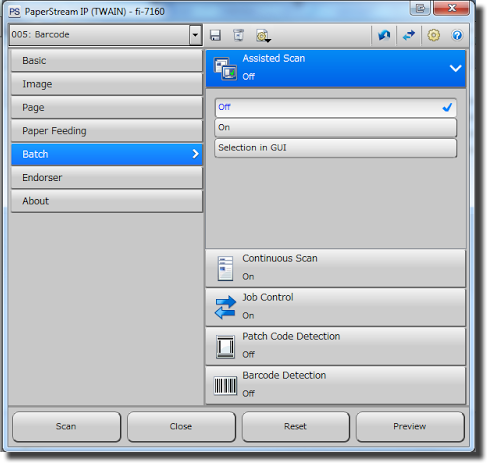
After clicking the at the upper-right, select from the list on the left. Detailed options will appear on the right.
Click on the right. Increase the Background Pattern Removal.
Click on the right. Set the color as close to the background color of the original document as possible.
Click on the right again. Add a point or two of Noise Removal.
Example: Assisted Scan
Example: Page Configuration Settings
![]() The help icon (question mark in a blue circle in the upper-right of the TWAIN dialog box) provides access to a robust set of vendor documentation with details on each setting.
The help icon (question mark in a blue circle in the upper-right of the TWAIN dialog box) provides access to a robust set of vendor documentation with details on each setting.

Comments?
To share feedback about this page or request support, log in with your NetID