Share Your CUView Content with Other Cornell Departments
Need to share your sign content with other departments or units around campus? Use Appspace’s convenient Common Library!
This article applies to: CUView Digital Signs
The recommended forum for sharing digital sign content at Cornell is the Appspace Common Library. This shared resource is available and visible to all Appspace users at Cornell and is ideal for uploading content you would like other departments on campus to display on their signs.
If Your Department Does Not Have Digital Signage
Even if your Cornell department or unit does not have a sign, you can still share content with those on campus who do. You should:
- Apply for a Cornell Appspace user account using the CUView request form. In the “Additional Information” box, specify that you would like Common Library access and do not have your own sign.
- Ask to be added to the e-List, CUView-Discuss-L, for users of Cornell’s CUView service, or join yourself by clicking this link and sending the email that opens. Once you have joined, you can send a note to the list letting others know you have uploaded content you want shared.
For All Users with Accounts: Share Your Content to the Common Library
You can access the Common Library much as you would the folders of your own Appspace account’s library. Find the Common Library folder located just below your own department account’s folders.
To share content from your computer to the Appspace Common library:
- Log in to Appspace. (If you do not already have access, submit a ticket requesting a user account here.)
- In the menu on the left edge of the Appspace dashboard, click Library.
- Click Common Library. To see the subfolders within the Common Library, click the small triangle arrow.
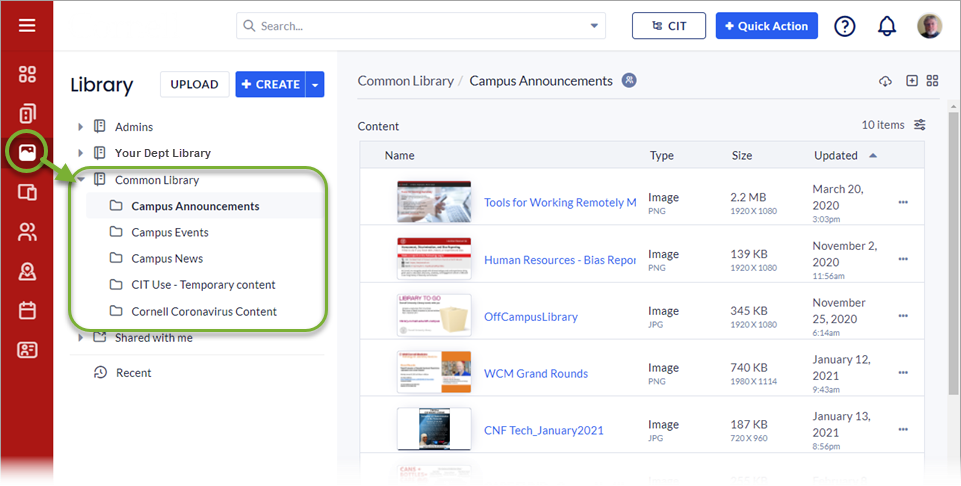
- Within the Common Library, click the name of a folder most appropriate for the content you want to share.
- Upload the content (or create new content from an Appspace Card template) as you would in a local Library folder. Begin by clicking Upload.
- For your new shared content, at the Upload media screen, click Settings.
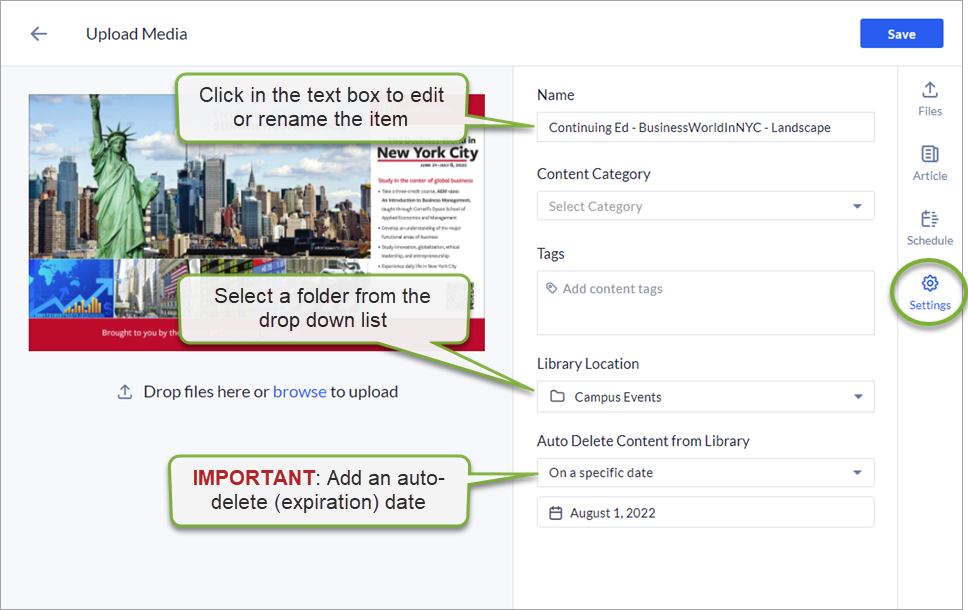
Name
Appspace uses the file name here by default, but you can rename it to something more descriptive. Try to indicate your department name, the topic of the slide, and the dimensions of the image—for example, “CIT - Fall Security Conference – Landscape 1920 x 1080.”
Content Category
Not used at Cornell.
Tags
(Optional) You may wish to create tags such as “16:9,” “4:3,” “landscape,” “portrait,” and your unit’s name to help others search or filter for content while browsing.
Library Location
This should already show the folder that you selected before clicking Upload Media. If not, or if you would like to upload to a different folder, select a folder from the dropdown list.
Auto Delete Content from Library
If your content promotes an event, it is important to provide an expiration date so that it will be removed from all playlists after the event has taken place.
- Save using the blue button at the top right. Your content can now be accessed by any Cornell Appspace user in the Common Library folder where you have saved it.
- Send a note to the Cornell Appspace-List (CUView-DISCUSS-L) letting other users know about the content you have posted. If you are not a member of that list but would like to be, send an email to cuview-discuss-l-request@cornell.edu with the subject line “JOIN.”
Users with Digital Signs: Get Content Shared to the Common Library by Others
From the Appspace dashboard:
- Click Library (from left side menu).
- Click Common Library. To view subfolders within the Common Library, click the small triangle arrow.
- Find the shared content you wish to use. Either:
- Browse the folders in the Common Library to find content.
- Go to the folder described in an email to the CUView e-List.
- When you find content that you would like to add to your channel, click the More menu icon (three dots).
- Click Add to Channel.
- Select the checkbox next to the channel(s) where you would like to add the content.
- (Optional) Click Scheduling to change the Content Duration, Schedule (dates), or Dayparting (times of day) to control the way the content displays in your channel.
- Click Add (blue button at top right). The content will be added to your channel.
Alternatively, from your Appspace dashboard:
- Click Channels.
- Click the name of the channel to which you would like to add shared content. Then:
- For a Playlist channel, click Edit.
- For an Advanced channel, click the Media widget containing your playlist, then click Content.
- Click Add.
- Click Browse Library.
- Click Common Library to open it. To see the subfolders within the Common Library, click the small triangle arrow.
- Find shared content that you wish to use. Either:
- Browse the folders in the Common Library to find content, or
- Go to the folder described in an email to the CUView e-List.
- When you find an item that you would like to add to your channel, check the selection circle located to the left of the item name in List view, or at the top left corner of the thumbnail in Grid view.
- Click Add. The content will be added to your channel.
Other Ways to Share Content
Please first consider using the Common Library to share your content instead of the methods described below, to reduce duplication of content in Appspace.
Box Folder Link
Some Appspace users will share content by providing a link from a Box folder. Click the link and download the item to your computer, then upload to your own Appspace Library folder. Add the content to your playlist as you would your own content. For details, visit Add Content to a Playlist (non-Advanced) Channel or Add or Remove Content from an Advanced Channel Media Zone.
Attachment to an Email Sent to the CUView E-List
When content is attached to an e-list email, save the attachment to your computer, then upload to your own Appspace Library folder. Add the content to your playlist as you would your own content. For details, visit Add Content to a Playlist (non-Advanced) Channel or Add or Remove Content from an Advanced Channel Media Zone. Note that e-lists limit the size of attachments that can be sent to the list through email (700Kb).
Comments?
To share feedback about this page or request support, log in with your NetID