Free/Busy Settings in Microsoft 365 Calendar
With Microsoft 365 calendar (Outlook for Windows, Outlook for Mac, and Outlook on the web), people can see your “free/busy” times in order to choose a meeting time. This article describes this setting and how to modify it.
This article applies to: Microsoft Outlook , Outlook for Mac , Outlook for Windows , Outlook on the Web
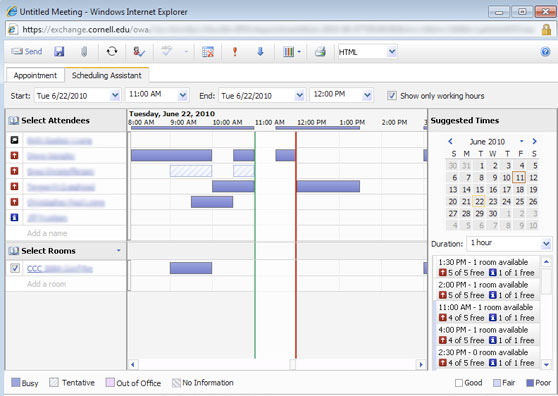
Your free/busy times are shown when someone invites you to a meeting they are scheduling. The meeting proposer can see your free/busy times with the Scheduling Assistant.
A color-coded grid shows this information:
- Tentative - something is scheduled on your calendar, but it’s okay to schedule another meeting then.
- Busy - something is scheduled on your calendar.
- Out of Office - you’ve blocked time on your calendar and tagged it as “Out of Office.”
- No information - your calendar information is not available.

If you’re happy providing this level of information to other calendar users, and most of our users are, you don’t need to take any steps. Your Microsoft 365 calendar comes set up this way.
Adjust Your Free/Busy Settings
You can adjust your free/busy settings in Outlook on the web, as well as with Outlook for Windows and Outlook for Mac.
Learn more about how to share your calendar, so anyone at Cornell (or only specific people) can view the subject and location of items on your calendar.
Use the "Can view titles and locations" permission level to let everyone see the subject and location of the items on your calendar (instead of just the start and end times). Your private items will still be private. This setting affects only what people see when they use the in Outlook when proposing a meeting. It does not allow everyone to open your calendar and browse it.

Comments?
To share feedback about this page or request support, log in with your NetID