Add Chapters and Slides to Media in Video on Demand
This article applies to: Video on Demand
Overview
Chapters
Chapters are markers that work like bookmarks within the video. Using them, you can jump directly to that section of the media.
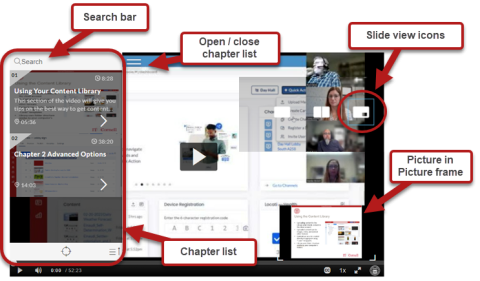
- Open the Chapter listing by clicking the Navigation icon (three lines) at the top left corner of a video that has chapters.
- Click a chapter name to jump to that part of the video.
Search for a chapter name or tags by typing into the search field at the top of the chapter list. Click a search result to jump to that point in the video.
Slides
Slides can be inserted into the video to accompany the material in the video. They can be displayed in the video player in three different ways:
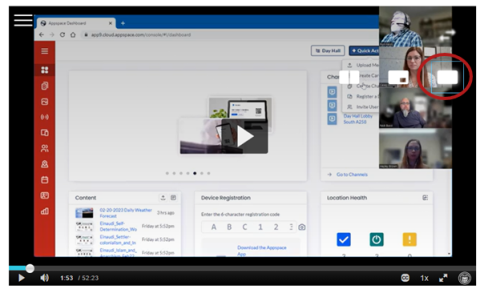
- Picture in Picture (current slide shows as small image in the bottom corner of the video)
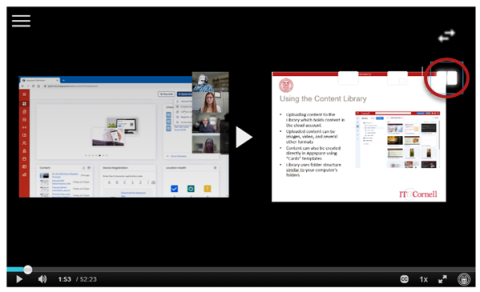
- Side by Side (video and slide content are both visible beside each other)
- Single View (either the video or the slide shows full-screen).
Open the Timeline of a Video
To work with chapters and slides, you need to open the video’s Timeline. To do this:
- Sign into Cornell Video on Demand (link opens the Video on Demand website).
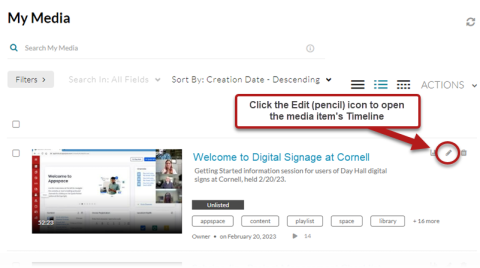
- Click My Media.
In the listing for the video, click the Edit icon (small pencil).
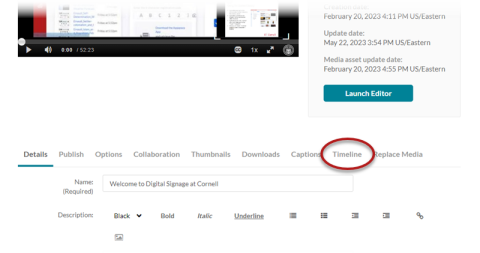
Click the Timeline tab.
The Timeline tab displays a horizontal line with timings corresponding to locations in the video. You can use it to select locations within the video to insert chapters and slides.
The vertical red line marker shows your current selected point in the Timeline. Click another point in the timeline to move the marker to that point. When you work with Chapters and Slides, use the marker to select the point in the Timeline where you want to perform the action.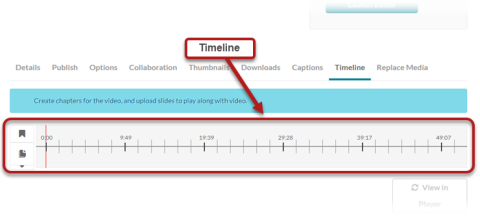
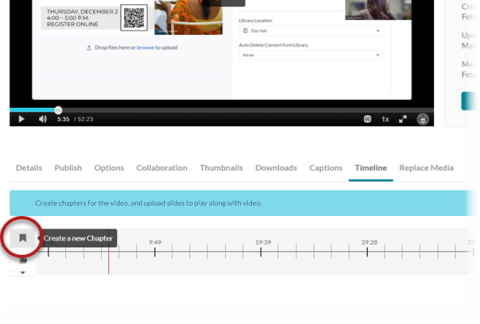
Add a Chapter
To add a chapter mark in a video:
- Open the Timeline, as shown in the section Open the Timeline of a Video above.
- Click the Timeline at the point where the new chapter mark should appear (the red line marking the current point in the Timeline will move to the spot you click).
Then click the Create a new Chapter button (bookmark icon).
- To add a thumbnail image for the chapter, either:
- Click Auto to use a snapshot of the video at the chapter’s start time. This is the default option.
- Click Upload to use a different image than that chosen by the Auto option. Drag and drop an image file, or browse to its folder on your computer, then click Save to upload it.
To add the name, description, or tags for the chapter, use the Chapter Information text fields to add or edit content. Tags are comma-delimited and can help users search for the chapter while watching the video.
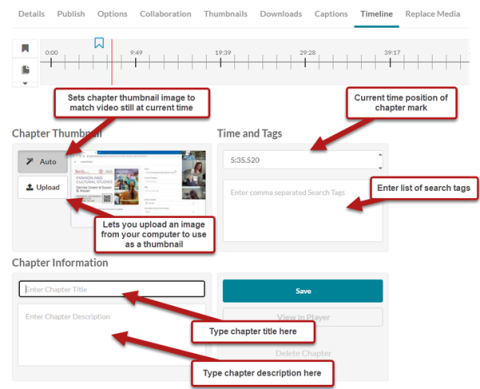
- To adjust the start time of the chapter, either drag the chapter bookmark icon to a new location in the Timeline, or type a new value in the start time field.
- Click Save when you have finished adding Chapters.
Edit an Existing Chapter
- Open the Timeline, as shown in the section Open the Timeline of a Video above.
Select a chapter by clicking its chapter icon. The chapter details will be displayed below, in the Chapter Thumbnail and Chapter Information panels.
- To add or replace a thumbnail image for the chapter, either:
- Click Auto to use a snapshot of the video at the chapter’s current start time.
- Click Upload to use a different image. Drag and drop a new image file, or browse to its folder on your computer, then click Save to upload it.
- To edit the name, description, or tags for the chapter, select the chapter icon, then use the Chapter Information text fields to add or edit content. The Tags field lets you type in comma-delimited text tags that can help users search for the chapter while watching the video.
- To adjust the start time of the chapter, either drag the chapter bookmark icon to a new location or type a new value in the start time field.
- Click Save when done making edits.
Delete an Existing Chapter
- Open the Timeline, as shown in the section Open the Timeline of a Video above.
- Click the chapter icon you want to delete.
Click Delete Chapter.
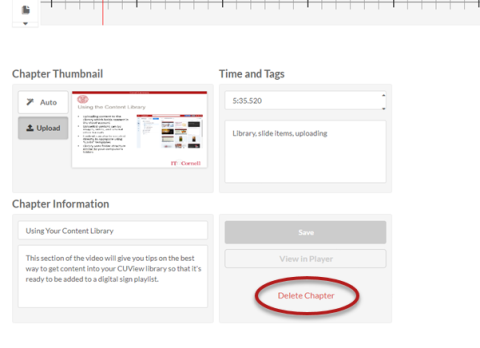
- The system asks you to confirm by clicking Delete.
Add Slide Content to a Video
Open the Timeline, as shown in the section Open the Timeline of a Video above, then:
To add a single slide:
Click the small down arrow below the slides icon, then click Upload Single Slide from the menu.

Click the Upload Slide icon, then click Choose a file to upload.
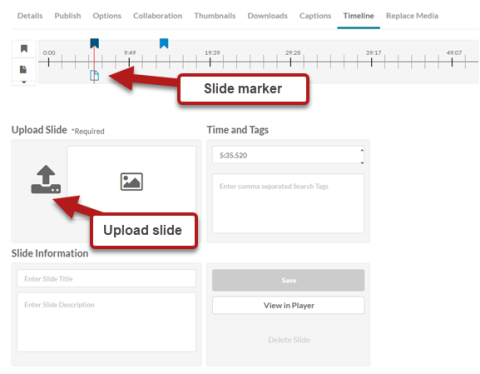
- Browse to the slide image you wish to upload, then click Open.
- Click Save.
- Fill out the Slide Information text fields.
- Click Save.
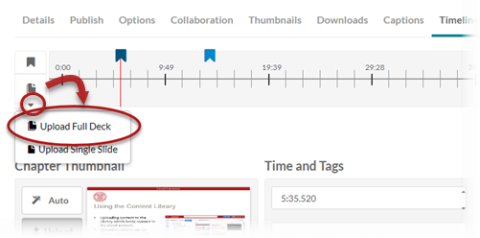
To add multiple slides:
Click the small down arrow below the slides icon, then click Upload Full Deck from the menu.
Click the upload icon. For best results, be sure to choose a resolution appropriate for the dimensions of your video content, either Normal (SD or 4:3 aspect ratio) or Wide Resolution (HD or 16:9 aspect ratio).
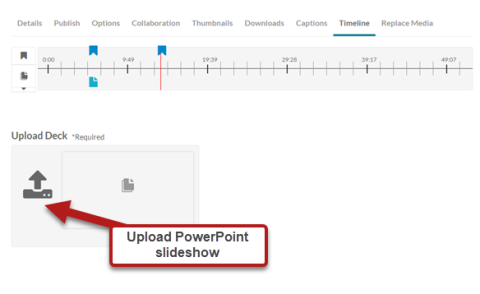
- Follow the prompts to upload a PowerPoint document containing the slides you want to use with your video. The system will show a message that it is processing your slides.
The system will automatically space the slides across your video Timeline. Click each slide icon to adjust the time position as appropriate to accompany the video content.
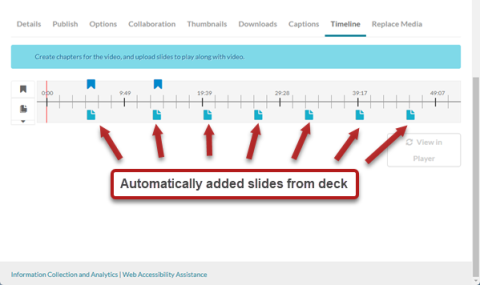
For each slide, after you have adjusted its timing, fill out the Slide Information and tags fields as appropriate.

- Click Save and repeat for each slide until complete.
Delete Slide Content from a Video
- Open the Timeline, as shown in the section Open the Timeline of a Video above.
- Select the icon of the slide you would like to delete.
- Click Delete Slide, then confirm in the dialog box by clicking Delete.
Change the Video Player Slide View
While playing a video that includes slide content:
- Hover the cursor over the video.
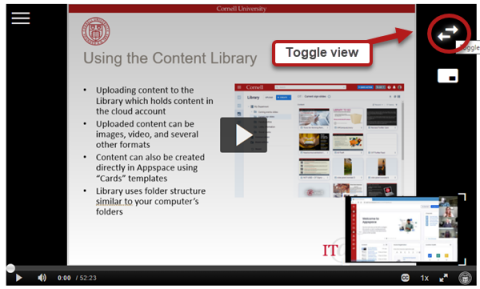
- Click the View icon.
- Click a view choice to switch to that view:
Picture in Picture
Side by Side
Single View
To swap the video and slide views with each other, click the Toggle View icon.
Comments?
To share feedback about this page or request support, log in with your NetID