Request a New Resource Account
This article applies to: Resource Accounts
For a description of all Resource Account roles and terms, see our Resource Account Terminology article.
Who Can Be a Resource Account Sponsor
The first decision to make when requesting a new Resource Account is who will be the Sponsor. If you are a currently employed staff, faculty, or affiliate member, you can be a Sponsor. The Sponsor is ultimately responsible for the Resource Account. The Sponsor field will be automatically filled in with the NetID of the person who is requesting the Resource Account, but it should be changed if the person isn't eligible to be a Sponsor or is simply acting on behalf of someone else.
The Sponsor cannot be a student, an alumnus or alumna, a holder of a guest or sponsored NetID, a former faculty or staff member, a retiree, an e-list, or another Resource Account.
Who Can Be a Resource Account Requester
If you are a currently employed staff, faculty, affiliate member, a current student who is acting on behalf of a "Registered Student Organization", or a retiree who is collecting retirement benefits, you can request a Resource Account. If you're a student or retiree, you must identify someone else who is eligible to be the Sponsor for the Resource Account.
Anyone with a valid NetID can be designated by the account Requester and Sponsor to be an account owner.
Fill Out the Request Form
- Use your browser to visit the Exchange Account Manager at https://eam.exchange.cornell.edu
- Click , then click .
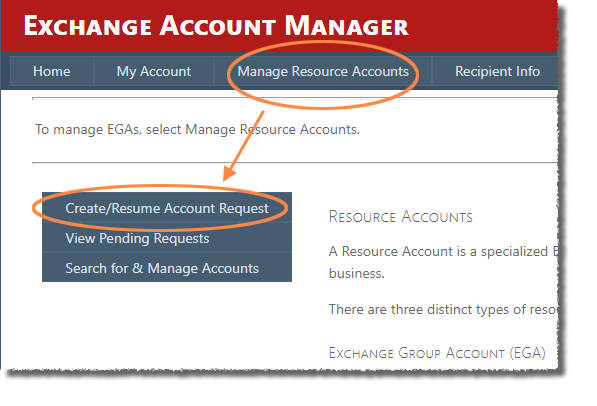
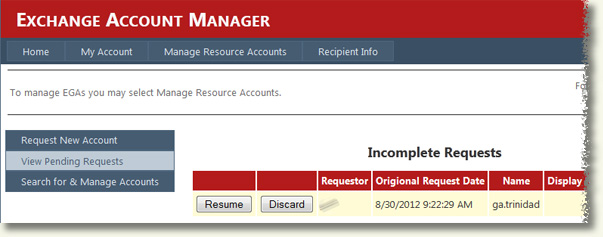
- If you previously started but did not finish a new account request, you'll see the incomplete request listed. Click to finalize your request, or to start over with a new request. (We'll assume you are starting a new request. If you are resuming, skip down to the appropriate step.)
- Enter a name for your account, conforming to the conditions listed. Here are a few additional notes on naming the account:
- We strongly recommend that the name you request starts with your department's abbreviation (cals-admin, cit-admin, ilr-admin, etc.).
- The name should be descriptive of the function or department.
- The name should NOT be a term that applies to many departments or organizations, for example, Director, Dean, Admin, etc. It is okay to use such terms as part of a name, if the entire name is more descriptive, for example, director-of-bees, sailing-techsupp, etc.
- The name should NOT include a specific human being's name.
- Letters are allowed. By "letters" we mean the 26 unaccented, lowercase letters of the English alphabet.
- The digits 0-9 are allowed, but we suggest that you avoid using the digits 0 and 1, since they are easily mistaken for letters. In some cases, for example an address that includes a year such as 2013, the context makes it clear.
- The only special characters allowed are period, dash, and underscore.
- The name must begin with a letter.
- The name cannot resemble a NetID. NetIDs take the form of two or three letters followed by one or more digits.
- The portion of the name you enter (that is, not including the "ga." that is added to the beginning of every Resource Account name) is limited to 16 characters.
- Even if your requested name meets these criteria, it is possible that CIT will modify it in the interest of clarity, if, for example, there is another account with a very similar name.
Please do not publicize the name you've requested until you've received notification from CIT that your Resource Account has been created. It is possible that we will need to modify the name and/or email address(es) in the interests of clarity.
- Press or click anywhere on the screen outside the name field. Assuming the account name you entered is valid and not already in use, you'll see the Configure New Account screen.
- Fill out the form using the on-screen guidelines. See the remainder of this article for more notes and details about the various sections.
- Click Submit when you are finished.
If there are any issues with your entries, you'll see the appropriate error message(s).
If the form is submitted successfully, you'll see a confirmation message. If you specified someone else as the Sponsor, that person will need to respond to the automated email message they'll receive before your request can be processed.
You will receive an email confirmation that the account has been requested. In a short while, you will receive email notification that your account has been approved. IT is not yet ready for use, though. Full provisioning can take 3-5 hours.
When your account is approved, everyone listed in any capacity on the request form will be notified of their role.
Please do not publicize the address you've requested until you've received notification from CIT that your Resource Account has been created. It is possible that we will need to modify the email address(es) and/or display name in the interests of clarity.
Exchange Account Type
The three types of Resource Account are
-
Exchange Group Account (EGA): A fully-featured mailbox that can be accessed by multiple people. EGAs are useful for situations where more than one person handles the incoming messages and/or when messages are intended for a particular purpose rather than a particular person.
-
Room Account: A mailbox assigned to a meeting location, such as a conference room, auditorium, or training room.
-
Most units have rules about naming and managing room resources. Please contact your unit staff before creating meeting room resources.
-
Equipment Account: A mailbox assigned to a resource that is not tied to a specific location, such as a portable computer projector, microphone, or a company car.
Email Address(es)
By default, the email address matching your account name will be created, unless that address is already in use by another Resource Account.
You can request multiple email addresses, but please limit your requests to only those addresses you truly need. (Once an address has been assigned, it can never be used again, even if you stop using it and someone else requests it.)
Please do not publicize the address you've requested until you've received notification from CIT that your Resource Account has been created. It is possible that we will need to modify the email address(es) and/or display name in the interests of clarity.
Here are a few additional notes on creating email addresses:
-
Letters are allowed. By "letters" we mean the 26 unaccented, lowercase letters of the English alphabet.
-
The digits 0-9 are allowed, but we suggest that you avoid using the digits 0 and 1, since they are easily mistaken for letters. In some cases, for example an address that includes a year such as 2013, the context makes it clear.
-
The only special characters allowed are period, dash, and underscore.
-
The address must begin with a letter.
-
The address cannot resemble a NetID. NetIDs take the form of two or three letters followed by one or more digits.
-
The address must not start with "ga" followed by a symbol character. For example, ga-horses is not acceptable, but galloping-horses is.
-
The address must not end with
-
-l (a dash and the letter "L")
-
-l-request
-
-l-owner
-
-
Although email addresses can be quite long (more than 50 characters), it's best to keep them reasonably short.
-
The address should NOT be a term that applies to many departments or organizations, for example, director@cornell.edu, admin@cornell.edu, etc. Is it okay to use such terms as part of a name, if the entire name is more descriptive, for example, director-of-beekeeping@cornell.edu, sailing-techsupport@cornell.edu, etc.
-
Even if your requested address meets these criteria, it is possible that CIT will modify it in the interest of clarity, if, for example, there is another address with a very similar name.
If you request more than one address, use the Reply To Address column to select which address will be used as the Reply To address when sending messages from this account.
Sponsor
By default, your NetID will be filled in, since you're the person making the request. If you will be responsible for this Resource Account, AND you are a currently employed staff, faculty, or affiliate member, you are considered the Sponsor and you don't need to modify this field.
If that doesn't describe you, or if you are requesting this account on behalf of someone else, enter that person's NetID, then click anywhere outside the text field (or press Tab). Examples:
-
an administrative assistant requesting a Resource Account for a department (and the department head wants to be the sponsor)
-
a student requesting a Resource Account for a student organization (Resource Accounts for student organizations must have a faculty or staff sponsor)
A Resource Account must have one and only one Sponsor.
Owners
Owners control who has access to the online tool for managing Resource Accounts. By default, you (the person filling out the request form) are listed as an Owner. If you changed the Sponsor entry, that person is an Owner, too. You can add more Owners, if desired, now or later. A Resource Account must always have at least one Owner. Owners are automatically granted the Administrator, Send As, and Access roles. (See our Resource Account Terminology article for details on these roles.)
To add an Owner, enter that person's NetID, then click anywhere outside the text field (or press Tab). Repeat as necessary.
Optional IT Computer Support Staff
This field may be left blank. IT Staff listed here can add and remove roles associated with this account, but do not have access to the contents of the account mailbox (although that access can be added if desired).
To add IT Staff, enter that person's NetID, then click anywhere outside the text field (or press Tab). Repeat as necessary.
Comments?
To share feedback about this page or request support, log in with your NetID