
Create and Send Bulkmail in Marketing Cloud
Documentation for the second of two stages for sending bulkmail using Salesforce and Marketing Cloud: setting up the correspondence in Marketing Cloud. For the first stage, see Prepare Bulkmail Address List in Salesforce.
This article applies to: IT@Cornell Site Management
Edit Content in Marketing Cloud
The following instructions focus on service announcements and bulkmail communications, which typically contain minimal formatting and no images. For formatted content with images, see the Create the Weekly IT News documentation.
- Open .
- Navigate through the folders on the left side to 02_CIT_COMM > Emails > Bulkmail.
- To create your own folder of bulkmail messages, right-click the Bulkmail folder for that option.
- Locate a previous bulkmail message and use the down arrow on the right to select Duplicate.
- Retain Bulkmail in the document Name, then edit the rest of the name for your purpose; update the Description as well. These property fields are only visible in Marketing Cloud.
- .
- Open the document and choose .
- To edit the message content, click in any box or section to bring up the pencil/Edit prompt, then click the selection again to open it in Content editor on the left. Choose in the blue box at the bottom of the Content editor to save changes.
Insert Customized Fields
- If personalization is required, the format for this is two percent signs (%%) before and after the field name. Punctuation goes outside the percent signs. Numbers in custom fields must be formatted, if desired, in the original data load.
- For example, the greeting might be: Dear %%FirstName%%, or different reference might contain %%CON_Net_Id%%
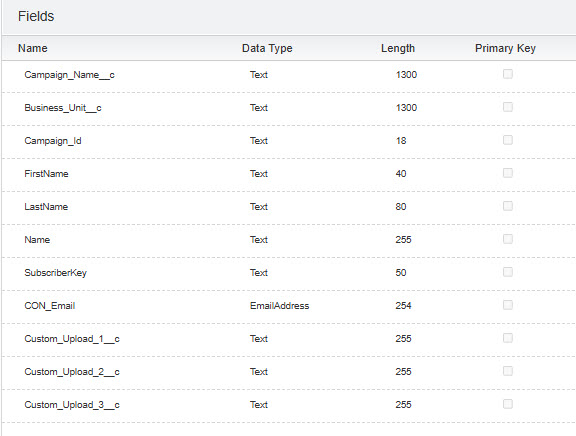
- Custom fields can be obtained from the Salesforce Data Extension. Example: %%Custom_Upload_2__c%%
- Verify the exact field name in the associated Data Extension to save troubleshooting when you test.
- To review the data extension, exit the Content tab or open a second Marketing Cloud window and navigate to Subscribers > Data Extensions.
- Select the associated Data Extension and examine the Fields on the right for exact names.
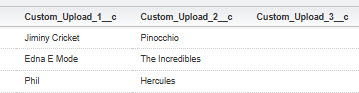
- If you used several custom fields but have forgotten which fields contains specific information, you can review the uploaded data for an individual by selecting the Records tab.
Preview and Test a General Message
- After content editing is complete, select the tab for Preview and Test.
- Select the Envelope icon to send a test message to up to five email addresses.
- Choose Default Transactional and a Sender Profile of CIT - Cornell University, info@m.cornell.edu, until Comm & Doc receives guidance for a better From address.
- .
Good news: the %%Pre-header%% behavior is limited to test messages and won't show in the final distribution.
Preview and Test a Personalized Message
- At the top of the window, choose the by the empty box.
- Drill down into the Data Extension folders to
- Choose any , then scroll down the page and to click the button. This test will not impact the individual in any way.
- Now choose the and add the email addresses you want to receive this test. You can choose up to five total email addresses for a test.
- Your NetID address is always the first address, but you can remove it.
- Every email address will receive the same test and the content will appear to those addresses the same way the selected subscriber would view it. For example, if there is personalization, the email will contain that subscriber's relevant information.
- Choose Default Transactional and a Sender Profile of CIT - Cornell University, info@m.cornell.edu, until Comm & Doc receives guidance for a better From address.
- .
Check Accessibility and Make Final Adjustments
- While waiting for the test to arrive, select the to review the initial Litmus Accessibility findings inside Marketing Cloud. Sign in with your external Litmus account, using your NetID email address and a non-NetID password created for this account.
- Make appropriate edits after reviewing the test in Outlook on the Web, Outlook Desktop, and other email readers.
- In the top right corner, choose .
- Review the test message in Outlook Desktop and other commonly used email clients.
Submit for Verified Communications
- When content review is complete, select .
- Submit the finalized communication for inclusion in the Verified Communications program, using their request form.
- If your Marketing Cloud session expires before the verification process is complete, reopen the message from Content and navigating to the Bulkmail folder.
Send the Bulkmail Message
- Open the message.
- Stage One: select in the upper-right corner to open the four step process.
- Define Properties:
- Default Transactional
- Sender Profile of CIT - Cornell University, info@m.cornell.edu
Select the Audience
Stage Two, Select the Audience, requires you to already have your Data Extension set up. If you missed this step, see the Data Extension instructions on the Prepare a Bulkmail Address List in Salesforce page.
- To select the audience (Data Extension), navigate through the folders to CIT_COMM > Bulkmail
- Choose the appropriate Data Extension.
- Drag the Data Extension into the Targeted box on the right
- Accept the popup question about including All Subscribers.
Configure Delivery
Stage Three, Configure Delivery, is where you can send immediately or schedule a future distribution and update the location of link tracking for analytics.
- The default is Send Immediately.
- For a future distribution, change the default to Schedule and set the date and time.
- Change the Tracking from the default (your personal folder) to the CIT_Comm folder.
Review and Send
Stage Four, Review and Send, is your final chance to proofread the message and check the audience, sender, Commercial/Transactional type, and distribution date. If you find any errors, exit out of the send process and address, then return to the Send process and advance through the four steps.
- Browse through the audience, the content, the sender, and the footer.
- If everything looks good, check the in the top left corner for This information is correct and this email is ready to send.
- Checking the box will activate the blue button on the top right. If the distribution has been scheduled for future delivery, the blue button will read .
- Select or .
Comments?
To share feedback about this page or request support, log in with your NetID