
Prepare Bulkmail Address List in Salesforce
Documentation for the first of two stages for sending bulkmail using Salesforce and Marketing Cloud: uploading an address list to Salesforce. For the second stage, see Create and Send Bulkmail in Marketing Cloud.
This article applies to: IT@Cornell Site Management
Review Message for Custom Address Fields
Review or create the message draft to determine if custom or personalization fields are required for the address load (example: storage used).
Fit the CSV File to the Salesforce Template
- If requesting a mailing list, ask for NetID, Email, First and Last Name fields. Bulkmail may be the first time an individual's record is introduced to Salesforce, which is why you need all four of these fields.
- Use the Contact Upload Utility CSV template.
- Do not change the order of the columns.
- Custom fields are optional. If used add them as column headers after the Campaign ID column: Custom Upload 1, Custom Upload 2, Custom Upload 3.
- Leave the field blank until the campaign has been created.
- and fields must contain valid data.
Create a Campaign in Salesforce
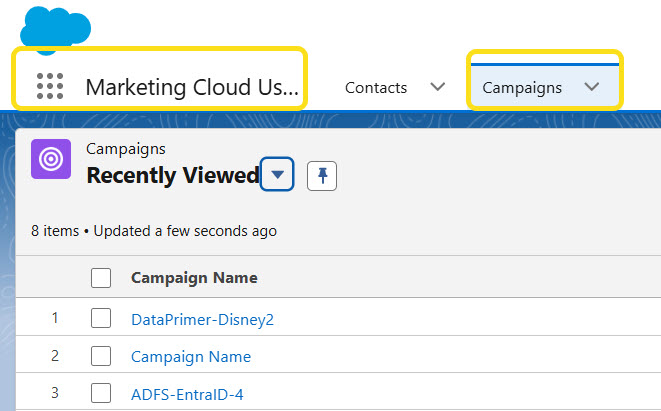
- Open Salesforce.
- Select the on the top left and select .
- Select the tab above the dark blue border.
- To create a new campaign, select the blue button in the top right corner.
- Create a name for the New Campaign (ex: ADFS - EntraID transition) and complete these fields:
- : Give your campaign a name.
- : check this box
- : Email (default is Event)
- : MC (Mass Communications)
- : short note for your own use or reminder.
- Click in the lower right corner of the window.
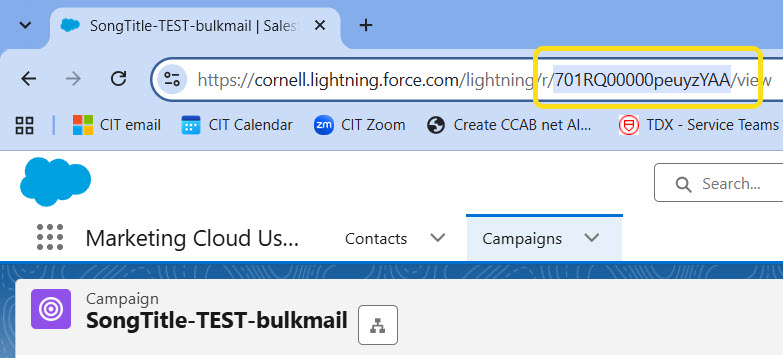
- Copy the value from the URL (a string, following Campaign/ and save it somewhere. You will need it several times in the process.
Complete the CSV File
- Paste the into the CSV file in the first cell under the appropriate column header.
- Paste the contents of the first cell for each of these columns into the rest of the rows:
- Data Primer Template ()
- Data Primer Status ()
- Data to import ()
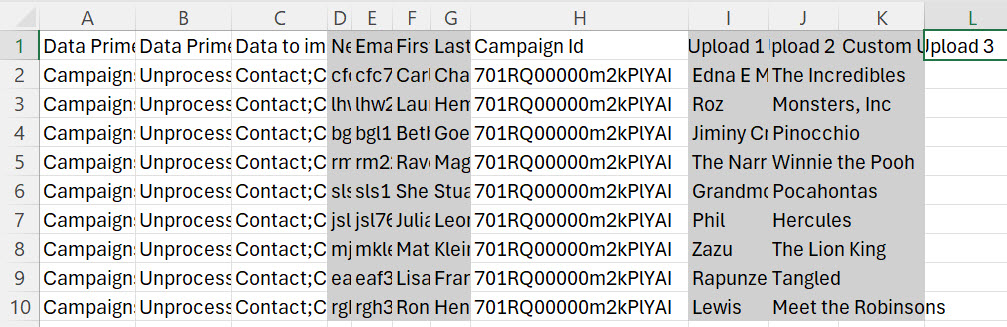
- Campaign ID (a string copied from Salesforce, similar to )
An example of a test file is shown in this image for reference. The gray columns contain unique data in each row. The other columns contain the same information in each row.
- Save as a CSV and close the file.
Import the CSV File
- Return to Salesforce. Be sure you are still seeing Marketing Cloud Users by the 9 dot grid, and the Campaigns tab is open.
- Click the in the top right corner and select .This opens a new window.
- Note: there is also a gear icon in the gray area above the list of existing campaigns but it only offers the "New" option. If you selected that icon, you will know you are in the wrong one because you can't see Setup.
- Using the search window, type in
Data Import Wizard, then select that entry from the search results. - Scroll down and click the dark olive green button.
- Complete the following three columns of selections:
- Column One: What kind of data are you importing? The default tab is Standard objects. Choose
- Scroll down the very long list of and select
- Column Two: What do you want to do? Choose
- Scroll down the light blue column to the very end, and check the box for
- Column Three: Where is your data located? or click to browse for your file.
- Select in the bottom right corner of the page.
- Wait for the progress bar to reach the second bullet, Edit mapping, and check the three samples shown in the greyed out columns to the right.
- If they look correct, select . It may take some time for the progress bar to reach Start Import.
- Before you choose the green Start Import button, you may see an error message that one, two, or three custom fields are unmapped. This usually occurs when the custom field names are not an exact match. Check your data to ensure you are using Custom_Upload_1, Custom_Upload_2, and Custom_Upload_3 and that these columns follow the Campaign_ID column in your CSV file. If you have unmapped columns, don't proceed with the data import. Go back and fix your CSV file and repeat the Set up steps again.
- Select in the bottom right corner of the page.
- A Congratulations, your import has started! popup will appear. Select to make that pop up go away – or ignore. Clicking just opens a new window to the Recently Viewed Contacts.
- When the import is complete, you will receive an email notification.
Verify the Campaign Record Count
- Return to the tab.
- Locate and click on the campaign.
- Scroll down to Campaign Statistics, and compare the Contacts in Campaign count to the CSV row count.
Wait for the overnight sync between Salesforce and Marketing Cloud.
Troubleshooting Missing Records
- Confirm the overnight sync has completed.
- Verify the was copied correctly.
- Verify the Salesforce campaign contains the expected record count.
- Verify the filter uses the exact .
Create a Marketing Cloud Data Extension
- Open Marketing Cloud and select Email Studio, then Email from the dropdown.
- Click Subscribers in the tabs at the top of the page
- Select Data Extensions.
- In the folders on the left, navigate through Data Extensions > 02_CIT_COMM > Bulkmail folder.
- Click , a blue button in the top right corner of the page.
- Choose Filtered Data Extensionand click the button.
- Under Select a Source, expand selections using the triangle icon for:
- Shared Items
- Shared Data Extensions
- 01_MassCommunications_Cornell
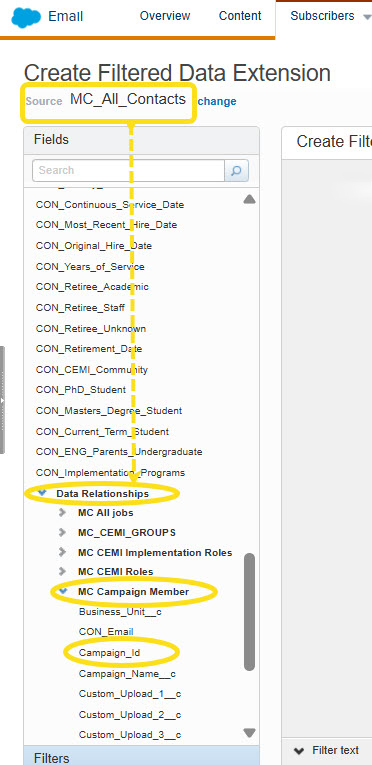
- From the pane on the right side of the window, selectMC_All_Contacts then click .
- Scroll down all the contact fields labeled "CON_" under MC_All_Contacts in the left pane to find two additional folders and expand the folder for Data Relationships.
- Expand the folder for MC Campaign Member.
- Drag and drop Campaign_Id to the Create Filter pane.
- Choose the "is equal to" option.
- Paste your Salesforce Campaign ID.
- Select .
- Enter a Name and Description then click .
- Confirm the expected record count.
- On the Properties tab, in the box that indicates whether it is Used for Sending and Used for Testing select , then check the box and click .
Set up and Send the Bulkmail in Marketing Cloud
For the second stage--setting up the message and distribution--see Create and Send Bulkmail in Marketing Cloud.
Caveats
- Do not send bulkmail to all faculty, all staff, or all students without approvals required by University Policy 5.2.
- Coordinate alumni communications with Alumni Affairs and Development.
- Do not send attachments through bulkmail. Publish content on a webpage and send a link instead.
Comments?
To share feedback about this page or request support, log in with your NetID