Manage Files in Azure Virtual Desktop
This article applies to: Azure Virtual Desktop
Each time you connect to the Azure Virtual Desktop (AVD) environment, you will be connected to a different computer, so storing your files on the virtual system is not an option.
To provide a consistent location for saving your files, AVD has been set up so that the files you save in the Desktop, Documents, or Pictures folders will be automatically saved into your Cornell Microsoft OneDrive account. This way, no matter which AVD computer you use, your files will be readily available.
While the process for opening and saving files is much the same as on a local computer, keep the points below in mind as you work.
Icon Differences
The icons for files that you save to OneDrive provide additional information.
- A file that is saved to both OneDrive and to the local computer will display a green check.

- A file that is saved only in OneDrive will display a cloud icon.

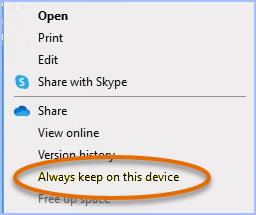
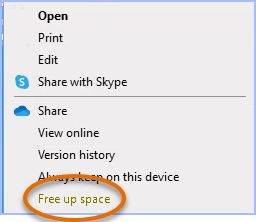
Right-Click Menu Differences
When you right-click a file icon, it will let you change the file save locations as noted above. You can change whether a file is saved in OneDrive or in both local and OneDrive locations.
- To copy the file to the local computer, click Always keep on this device.
- To save the file back to OneDrive only, click Free up space.
Troubleshooting
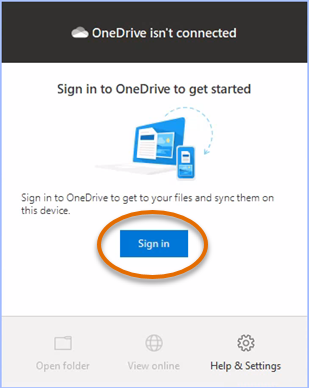
OneDrive should automatically connect to your session a few moments after you sign in to AVD. To verify, look at the OneDrive icon at the lower right corner of the screen, in the Windows System Tray.
- If OneDrive is connected, you should see its icon.

- If OneDrive has failed to connect, you will see a dark line through the OneDrive icon.

If OneDrive has failed to connect, click the . Click Sign In and enter your Cornell NetID email address (netid@cornell.edu) to reconnect OneDrive to your AVD session.
Do not use a personal Microsoft account to sign in.
Comments?
To share feedback about this page or request support, log in with your NetID