Restore a File
This article applies to: Shared File Services
You can restore previous versions of a file if your share includes snapshots.
Notes:
- If your share does not use snapshots, or the data is no longer in the snapshots (aged out), you cannot recover the data.
- Restoration of data from the offsite Disaster Recovery copy is not offered.
- In the event of a Virus or Security incident care must be taken in file restoration to ensure that suspect files are not restored. Consult your TSP for assistance.
- If the data on your share includes files or paths that exceed the 256 character Windows limit, replication is your best option. You may be unable to recover these from snapshots.
Restoring a File: Windows
- Navigate to the location where the file you want to restore was last stored.
- Right-click, and then click .
- Click the tab.
- Hourly and daily snapshots are displayed.
- In some cases, weekly snapshots may be displayed.
- The most recent snapshots are version “.0” (hourly.0, nightly.0, weekly.0)
- Select the snapshot containing the file you want to restore, and then click .
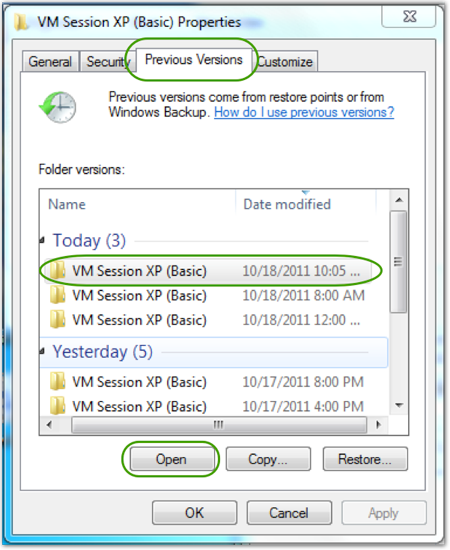
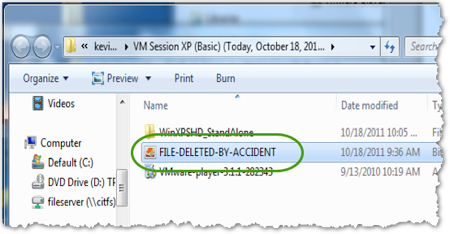
- Highlight the file you want to restore and then to move it to the correct location, either right-click and click or drag and drop.
Restoring a File: Unix/Mac OS
Restoring a file on Unix or Mac OS from a snapshot is conceptually similar to the Windows process above, but you'll use the command line via cmd-prompt/Terminal/xterm.
There is a hidden sub-directory, .snapshot, in every sub-directory below your share.
Details:
- Contains the historical copies of the contents of the directory.
- May not show with a “ls –lag” command
- Path-completion by pressing the Tab key may not work
Mac OS:
- Connect to the “share” as outlined in Using a UNC Path. This step mounts the “share” to your system which will allow you to use the command-line via a Terminal window to access the snapshots.
- Once connected, bring up a Terminal (Finder, Applications, Utilities, Terminal).
- On the Terminal, “cd /Volumes/path-to-file-to-restore”
Note: It may be simplest to “cd /Volumes”, followed by “ls”, and work your way down the path.
Unix/Mac OS
- With an xterm/Terminal window “cd” into the directory which needs file restoration.
- Enter cd .snapshot
- Enter
ls -lu
You'll see the list of date/time stamped snapshots which exist for your share.
Note: The command ls- la does not reflect the date/time stamps you expect. Use ls- lu. - Determine which snapshot directory contains the version of the file you want to restore.
- Hourly and daily snapshots are displayed.
- In some cases, weekly snapshots may be displayed.
- The most recent snapshots are version “.0” (hourly.0, nightly.0, weekly.0)
- Entries beginning with “cohesity” are from our DR-backup process, and change every 24 hours. These are effectively a daily version.
- Copy the snapshot of the desired file back to the current directory.
Comments?
To share feedback about this page or request support, log in with your NetID