Use the Microsoft Zoom Add-in for Outlook
Cornell users who want to schedule Zoom meetings using the Outlook calendar can use the Microsoft Zoom Add-in for Outlook to integrate the two applications. The current add-in that integrates Outlook and Zoom is provided by Microsoft.
This article applies to: Zoom
Previously, Zoom offered a Plug-in for Outlook that is no longer supported by Microsoft and Apple. This Zoom plug-in is deprecated and any remaining copies should be removed—follow the instructions under Remove the Deprecated Zoom Plug-In for Outlook below.
Be aware that Zoom session settings and details created with the deprecated Zoom plug-in cannot be edited with the new Microsoft add-in. This means that if you need to make changes to an old Zoom meeting that was scheduled with the legacy Zoom plug-in, it is recommended that you simply delete the old meeting and reschedule it using the new Microsoft add-in.
Be aware that Zoom session settings and details created with the deprecated Zoom plug-in cannot be edited with the new Microsoft add-in. This means that if you need to make changes to an old Zoom meeting that was scheduled with the legacy Zoom plug-in, it is recommended that you simply delete the old meeting and reschedule it using the new Microsoft add-in.
Get the Microsoft Zoom Add-in for Outlook
Cornell email users should already have the Add-in for Zoom installed in the Outlook desktop application and Outlook on the web. When you open an Outlook calendar event or start to create a new event, you should see the add-in in the Zoom section of the event menu.

If you do not have the add-in installed, follow the instructions under Get the Microsoft Zoom Add-in for Outlook below.
Schedule an Outlook Calendar Event that Includes a Zoom Meeting
To create a new Outlook event (meeting or appointment) that includes a Zoom meeting:
- Go to Outlook calendar and click New Meeting or New Appointment.
- In the Outlook desktop calendar, the Zoom section appears toward the right end of the calendar event menu ribbon.

- In Outlook for the web, find the Zoom icon at the right end of the calendar event menu. Clicking the icon will open a menu with the options Add a Zoom Meeting and Settings.

- In the Outlook desktop calendar, the Zoom section appears toward the right end of the calendar event menu ribbon.
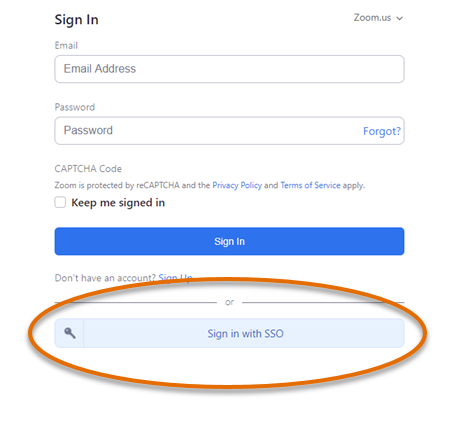
- You may be required to sign in by the add-in. At the Sign In panel, click Sign in with SSO. Do NOT sign in at this step using your email address and password—use the Single Sign-On (SSO) option, which will take you to Cornell’s sign in process.

- Next, in the Enter your company domain field, type
cornell. Then click Continue.
- Log in to Cornell’s CUWebLogin as usual with your Cornell NetID and Password. Authenticate with Two-Step Login if required. You will be returned to your Outlook meeting or appointment.
- The add-in will insert information about the new Zoom meeting scheduled for your Outlook event. Set up other Outlook event details as usual, such as the Required and Optional attendees and, if needed, physical Locations to accommodate in-person attendees with Room Viewer. (Link details are blurred out in the example below.)
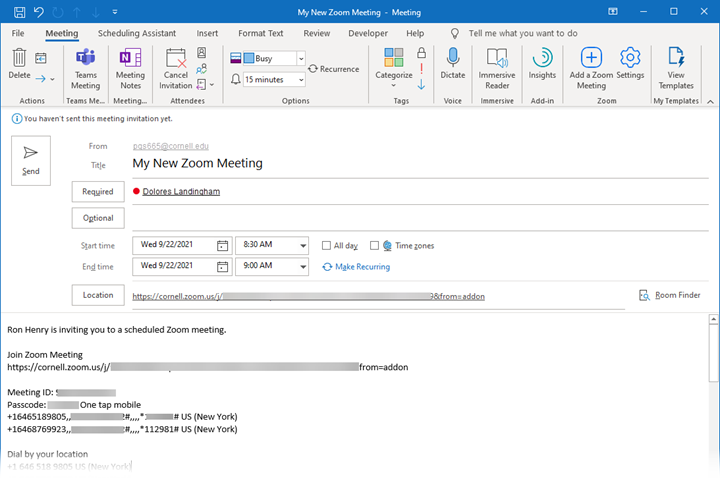
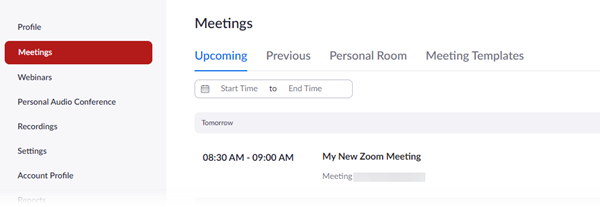
- When done, click Send. Attendees will receive the Outlook invitation that includes Zoom details. When someone accepts the Outlook invitation, the Zoom meeting will be added to their Zoom schedule of upcoming meetings.
Update Zoom Meeting Settings in an Outlook Calendar Event
To update the details of a Zoom meeting previously scheduled in Outlook calendar:
- Find the associated Outlook calendar event and open it.
- In the Zoom section of the menu ribbon, click Settings (gear icon). (In Outlook on the web, click the Zoom icon, then click Settings from the menu.)

- At the Sign In panel, click Sign in with SSO. Do NOT sign in here with your Cornell email and password—use the SSO option.
- Next, in the Enter your company domain field, type
cornell. Then click Continue.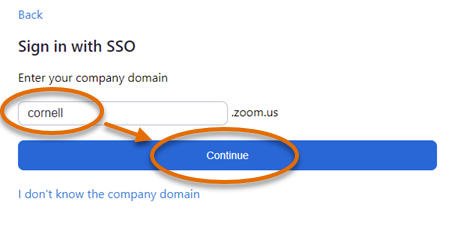
- Log in to Cornell’s CUWebLogin as usual with your Cornell NetID and Password. Authenticate with Two-Step Login if required. You will be returned to your Outlook meeting or appointment.
- The settings for the selected Zoom meeting will open in a side panel. Make the needed changes to your Zoom meeting, then click Update at the top of the Zoom panel to save.

- Click Send Updates to send the updated Outlook invitation to meeting attendees if necessary.
Get the Microsoft Zoom Add-in for Outlook
Getting the Microsoft add-in should only be needed on non-Cornell managed computers or systems where the add-in was mistakenly removed.
In the Outlook desktop app
- Click File.
- Click Manage Add-Ins. Outlook will open Add-ins for Outlook in a browser.
- Search for
Zoom for Outlookand click the Add button in its listing.
In Outlook on the web
- Click the Calendar icon.
- Click New Event, or open an existing event to which you would like to add a Zoom component.
- Click More (three dots).
- Click Get Add-Ins. Outlook will open Add-ins for Outlook.
- Search for
Zoom for Outlookand click the Add button in its listing.
In Outlook for the Mac
- Open Outlook.
- Click Home.
- Click Get Add-ins. Outlook will open Add-ins for Outlook.
- Search for
Zoom for Outlookand click the Add button in its listing.
For additional detail about installing the Microsoft Zoom Add-in for Outlook, visit Deploying and installing the Zoom for Outlook add-in page on the Zoom website.
Remove the Deprecated Zoom Plug-In for Outlook
Non-Cornell managed computers may need to remove the deprecated Zoom Plug-In for Outlook manually.
When present, the deprecated Zoom plug-in appears in the Outlook calendar menu like this:
If your computer is owned and managed by Cornell but still shows this feature, contact your local IT support staff. Otherwise, if you manage your own computer and have administrative rights, follow the steps below.
Uninstall the Zoom Plug-in Manually from a Windows PC
- Close all Office applications.
- Click the Start menu.
- Start typing
Apps and features, then click Apps & features when it shows up in the results. - In the list of Apps & features, find Zoom Plugin for Outlook. (The name may be followed by a version number.)
- Click Zoom Plugin for Outlook, then click Uninstall. (This may require administrative privileges.)
Uninstall the Zoom Plug-in Manually from a Mac
- Close all Office applications.
- Open Finder.
- Click Applications.
- Control-click Zoom Plugin for Outlook and then click Move to Trash, or drag it to the Trash.
If you need assistance beyond the information provided in this page, contact your local IT staff or the IT Service Desk.
Comments?
To share feedback about this page or request support, log in with your NetID