46XX IP Phone Overview and Feature Reference
This article applies to: IP Voice Service
Overview
- 7 line x 29 character display
- 24 system call appearance/feature button
- Provides automated call tracking with 100-entry call log
- Provides access to 104 speed-dial number
- Adjustable desk stand
Feature Reference
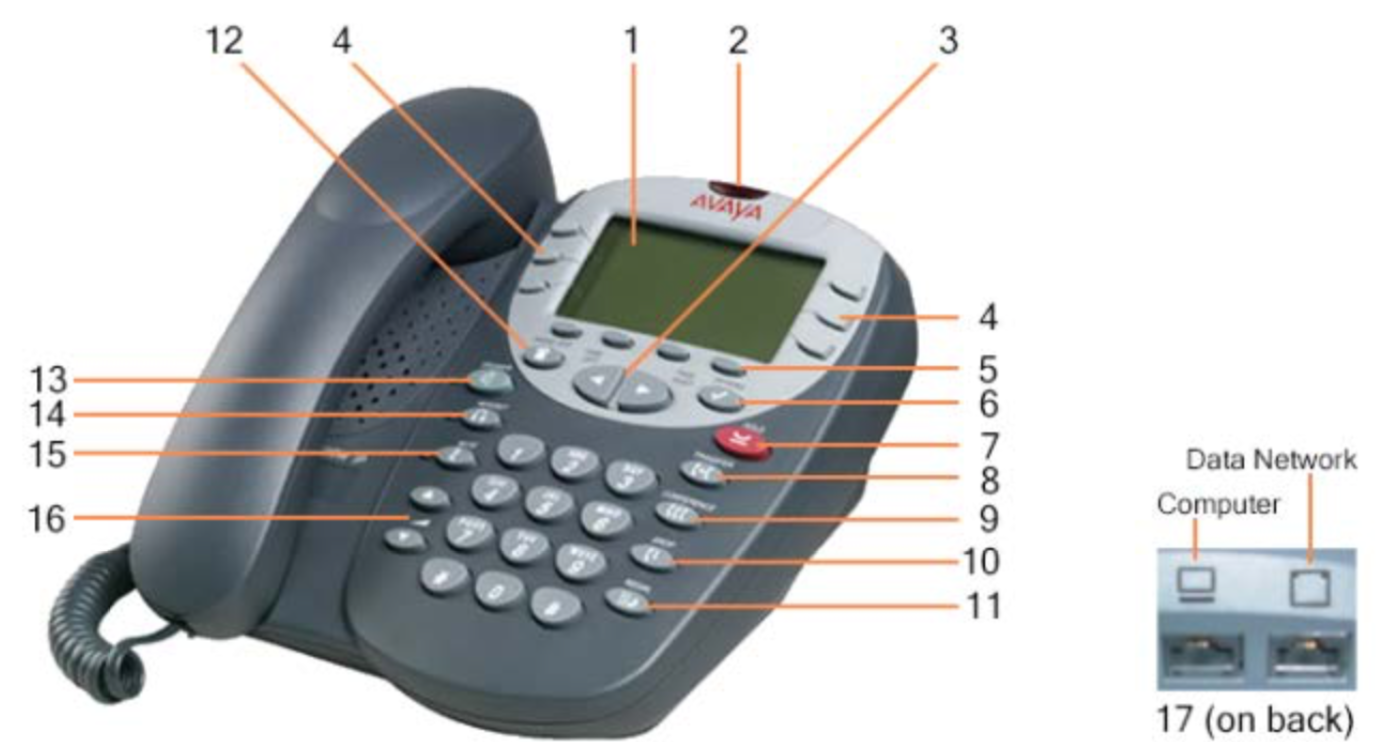
- Display: Panel located near the top of the phone that shows the status for the call appearances, information for a call, information provided by the Avaya call server, the Home screen, the Speed Dial screen, the Call Log screen, and the Options screens.
- Message Lamp: Indicator at the top of the phone that is lit when an AUDIX (voice mail) message has arrived.
- Arrow keys: Large left and right buttons that together form an oval, located below the display and small softkeys. The arrow keys move between screen pages, cycle through Call Log and Speed Dial entries, and move the cursor during data entry.
- Call appearance feature buttons: six buttons, three on either side of the display. They are used to access incoming/outgoing lines and programmed features.
- Softkeys: small keys located directly below the display. They perform specific functions: Speed Dial: Add – Edit – Delete – Done Log: list of incoming/outgoing calls
- Options button: Located to the upper-right of the arrow keys. Used to set ring tones, adjust display contrast.
- Hold button: Located to the lower-right of the arrow keys. Used to place calls on hold.
- Transfer button: Located below the hold button. Used to transfer calls.
- Conference button: Located below the transfer button. Used to make conference calls.
- Drop button: The next-to-last button from the bottom on the far right of the phone. Used to disconnect the current call. When on conference calls, used to drop the last person added.
- Redial button: Located on the bottom right of the phone. Used to redial the last number dialed.
- Exit button: Located to the upper left of the arrow keys. Used to return display to the first page of the Home screen.
- Speaker button (and indicator light): Located to the lower left of the arrow keys. Used to access the built-in speakerphone.
- Headset button (and indicator light): Located below the speaker button. Used to activate headset connected to jack located on the back of the telephone.
- Mute button (and indicator light): Located below the headset button. Used to turn off the microphone.
- Volume control buttons: The lowest two buttons on the left of the phone--upper increases volume and lower decreases it. Used to adjust speaker, handset, headset, and ringer volume.
- Network switch: Located on the back of the phone. To use your phone as a 10/100 switch, with the back of the phone turned toward you, plug your data connection in the Data Network port on the right, and your computer into the Computer port on the left.
Comments?
To share feedback about this page or request support, log in with your NetID