Assign Group Admin Rights (CornellAD Group Management)
This article applies to: Group Management
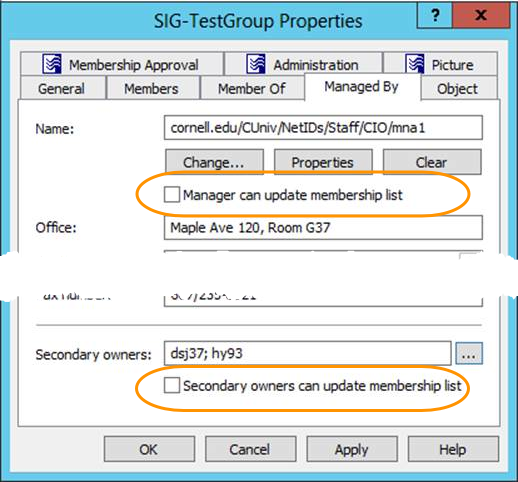
There are two levels of control over the properties of a group. The vendor's documentation calls these Primary Owners and Secondary Owners.
- Primary Owners can modify any of the group's settings, including membership. When working with the ARS Console, this field on the tab is labeled Name; in the web interface it's labeled Manager. The owner can add or remove administrators and owners, including themselves. The Primary Owner can be one NetID or one group. In addition to the person or group specified here, the person who creates a group has this same level of control.
- Secondary Owners can modify group membership. This field is labeled Secondary owners on the tab in both the Console and the web interface. You can specify one or more individuals and/or one or more groups.
For legacy permits, these two roles were populated during the permit's migration to CornellAD.
- The Primary Owner is a group with the name of the permit with "-adm" added to the end.
- The Secondary Owner is a group with the name of the permit with "-upd" added to the end.
Specify Primary Owner
Via ARS Console
- Navigate to the OU that contains the group.
- Double-click the group in the main console panel. A Properties dialog box for the group opens.
- Click the tab.
- Click . A Select Object box opens.
- Type all or part of a name, NetID, or group name in the box next to the button, then click .
- If there is only one match, the Select Object box closes and the Name field on the Managed By tab is updated.
- If there is more than one match, select the correct account, then click .
Note: The Manager can update membership list and Secondary owners can update membership list controls have no effect because the security for managing groups is configured internally in ARS. You do not need to check either of these boxes.
- Click OK to close the Properties dialog box.
You'll see that the person or group you selected has replaced the previous entry.
Via Web Interface
- Navigate to the OU that contains the group. The groups within that OU are in the panel at the right.
- Click the group. The group's properties are displayed on the right.
- Click the tab.
- Under Manager, click . A Select Object dialog box opens.
- Type all or part of a name, NetID, or group name in the Name box, and then click .
- Select the correct account from the search results, then click .
Note: The Manager can update membership list and Secondary owners can update membership list controls have no effect because the security for managing groups is configured internally in ARS. You do not need to check either of these boxes. - You'll see that the person or group you selected has replaced the previous entry.
Add Secondary Owners
Via ARS Console
- Navigate to the OU that contains the group.
- Double-click on the group in the main console panel. A Properties box opens.
- Click the tab.
- Near the bottom of the tab, click the ellipsis button (three dots) next to Secondary owners. An Add or Remove Owners box opens.
- Click . A Select Objects box opens.
- Type all or part of a name, NetID, or group name in the large text box at the bottom of the dialog box, and then click .
- If there is only one match, the Select Object box closes and you'll see that the Add or Remove Owners box is updated.
- If there is more than one match, select the desired account, then click .
- (optional) Repeat steps 5-7 to add more administrators.
Note: The Manager can update membership list and Secondary owners can update membership list controls have no effect because the security for managing groups is configured internally in ARS. You do not need to check either of these boxes. - Click to close the Add or Remove Owners dialog box.
Via Web Interface
- Navigate to the OU that contains the group. The groups within that OU will be displayed in the panel at the right.
- Click on the group. The group's properties are displayed on the right.
- Click the tab.
- Near the bottom of the tab, click under Secondary owners. A Select Object dialog box opens.
- Type all or part of a name, NetID, or group name in the Name field, then click .
- Select the desired account from the search results, then click .
- (optional) Repeat steps 4-6 to add more Secondary Owners.
Comments?
To share feedback about this page or request support, log in with your NetID