Webcam with Tripod (Clear One Unite 20 or similar model)
This article applies to: Classroom Technologies
For assistance with classroom audio-video equipment, please contact your local IT support staff.
About
A webcam provides a wide, 120° field of view and can be mounted either on a laptop, monitor, or tripod.
Advantages over laptop camera
A wide-angle webcam provides superior wide-angle coverage of the classroom space and uses advanced noise reduction to produce clearer, HD quality (1080p) video. Many camera models also provide stereo sound from the classroom if you choose it as your audio source for your Zoom meeting.
Basic use
Set up the camera
- Using the camera’s USB cable, connect to a USB port on your laptop.
- Position the camera using the available tripod (see tripod recommendations below).
- Be sure to remove the lens cap before starting your online session. When you are done using the webcam, carefully replace the lens cap.
Select the correct device in Zoom
After the webcam has been connected to your computer, to use it for your Zoom session video, log in to Zoom, then:
- Click Settings (gear icon) at the top right of the Zoom application.
- Click Video.
- From the Camera dropdown list, select Unite 20 Camera.
- Under My Video, mark the checkbox Enable HD.
Tripod option #1: Tabletop tripod with flexible legs (GripTight ONE or similar)
About
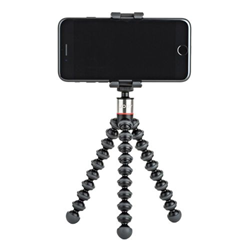
This is a smaller, very flexible tabletop tripod which can support either a webcam or a smartphone.
Attach a webcam to the tripod
The camera should already be attached to the tripod. If it is not, contact local IT support for the classroom for assistance. Adjust the flexible legs and position of the tripod to point the smartphone camera at the area you would like to feature in the web conferencing session.
Attach a smartphone to the tripod
Use the tripod's "jaws" to clamp the sides of the smartphone. Then adjust the position and tripod's flexible legs to point the smartphone camera at the area you would like to feature in the web conferencing session.
Tripod option #2: Floor-standing camera tripod
About
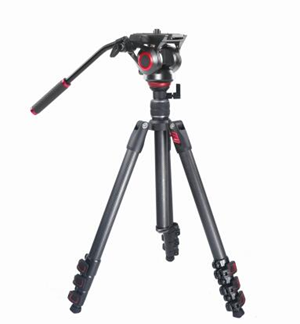
This larger tripod stands on the floor. Its three adjustable legs allow you to position a webcam at a convenient height (from 20-57”) for your particular classroom needs, and its camera mount allows you to smoothly pan the classroom space easily or angle the camera view up or down as needed.
Adjusting the tripod's legs
Each tripod leg has several extendable sections.
- Sections are held in place by a series of plastic clamps.
- Open one of the a plastic clamps by gently pulling it up to allow that section of the leg to slide in or out.
- Gently close the clamp again to lock the sliding section in place.
- Repeat this process to adjust the tripod's overall height and angle.
- Be careful to keep the tripod balanced to avoid having it tip over and damage the webcam or smartphone attached.
Attach the webcam to the tripod
The camera should already be attached to the tripod. If it is not, contact local IT or AV staff for assistance.
Comments?
To share feedback about this page or request support, log in with your NetID