Document Camera (IPEVO VZ-R)
This article applies to: Classroom Technologies
For assistance with classroom audio-video equipment, please contact IT support staff for your teaching space.
About
Use the document camera to show documents, textbooks, artwork, or objects on a work surface in real time to remote viewers connected to your class through Zoom.
Getting Started
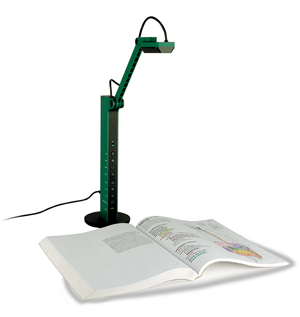
The document camera consists of:
-
a weighted base on which the device controls are located
-
a jointed arm that lets you position the camera at various heights and angles
-
an 8MP camera at the end of the jointed arm that swivels
Plug it in
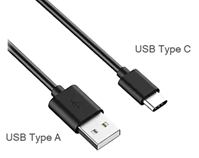
The document camera is connected to your laptop via USB. Plug the narrow end of the USB type-C cable into port labeled USB / Power on the back of the weighted stand and the wide end of the cable into your computer’s USB (Type-A) port.
Turn it on
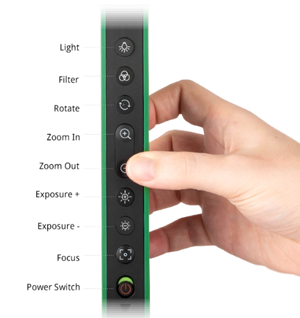
Find the document camera’s power switch  near the bottom of the front of the weighted stand. Slide the switch down. The LED indicator should glow green.
Share the Document Camera in Zoom
Log in to your computer’s Zoom program. Then:
- Click Settings (gear icon) at the top right of the Zoom application.
- Click Video.
- From the Camera dropdown list, select IPEVO VZ-R.
- Under My Video, mark the checkbox Enable HD.
- If your on-screen preview image is reversed, unmark the checkbox Mirror my video.
- To rotate the image, either:
- Rotate the camera head at the end of the swivel, or
- Press the Rotate button located on the camera’s base.
Advanced Share in Zoom
During your Zoom session, to share the content from the document camera:
- In the Zoom control bar, click Screen Share.
- At the top, click the Advanced tab.
- Choose Content from 2nd Camera.
- Click Share (blue button at bottom right).
Use Camera Controls
You can control the size and orientation of the image coming from your document camera with the following controls located on the stand:
Light
Press to toggle on and off the LED light located on the camera head.
Filter
Press to toggle video filtering on and off.
Zoom
The Zoom buttons are located on the camera base. Press the Zoom In button to zoom in on your document, and Zoom Out to zoom out.
Rotation
Press to rotate the live image.
Exposure
If the image of your document is too dim and turning on the LED light (see above) is not sufficient, adjust the brightness of the image using the Exposure button.
Focus
While the document camera has an auto-focus lens and should always stay in focus, if your image remains out of focus, use the Focus control to adjust.
Additional Information
- For more about using the IPEVO document camera with Zoom, visit IPEVO Step-by-step Guide for Zoom.
- For more details, visit VZ-R HDMI/USB Dual Mode 8MP Document Camera.
Comments?
To share feedback about this page or request support, log in with your NetID