Annotation tablet (Wacom One)
This article applies to: Classroom Technologies
For assistance with installation of software and drivers for the Wacom One annotation tablet, please contact the local AV/IT support staff for your home college.
Annotation features in Zoom require Zoom version 5.2 or greater. For information on checking what version you have and upgrading if necessary, visit Check Your Zoom Application Version and Upgrade to the Most Recent Version.
About
An annotation tablet provides a surface on which an instructor can sketch and draw, display images, and annotate photos or documents, while displaying them to the class. In addition, in Zoom Rooms at Cornell, Wacom One tablets are used as touch interfaces to control video resources.
Get Started
The annotation device, once connected and turned on, lets you use a special stylus (pen) to draw and annotate on the front surface of the tablet.
DO NOT use any other pen or marker with the annotation tablet.
All pen tablets and pen displays include a cordless, battery-free pen that you use to interact with your device. You can hold, write, and draw as you normally would with a pen or pencil.
Detailed instructions for getting started with a Wacom One tablet can be found at Get Started with Your Wacom One.
Plug it in
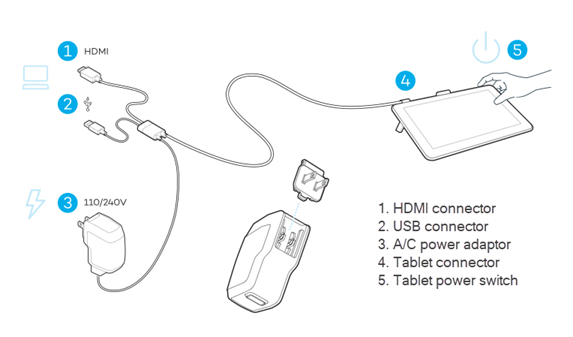
To connect the Wacom annotation tablet to a computer:
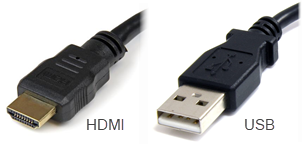
- The tablet uses an “X-shaped” cable, which has two connections on each end. Find the end with an HDMI and USB connector.
- Plug the HDMI connector into the HDMI port and the USB connector to a USB port of your computer.
- If necessary, on the other end of the cables, plug the L-shaped tablet display connector to the back of the tablet, then plug the USB connector to the power supply. Plug the power adapter into an AC receptacle.
Turn it on
Press the Power button on the top right of the tablet to turn the device on and off. When the device is on, the LED displays solid white.
Install Tablet drivers
For assistance with installation of software and drivers for the Wacom One annotation tablet, please contact the local AV/IT support staff for your home college.
Drivers and software installation packages can be found at Wacom Product Resources. Once there, click either the Mac or Windows link for your system.
Set up Wacom Tablet for your computer
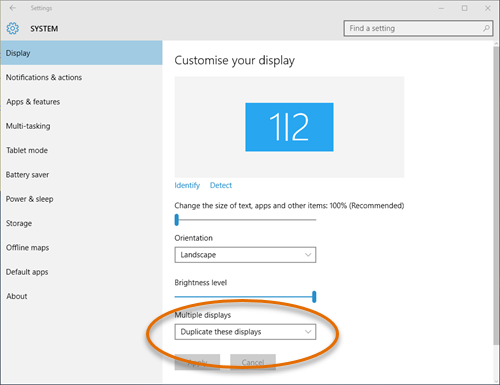
On a Windows device
- Click the Windows 10 Start menu.
- Type
Display, then click Display Settings at the top of the search results. - Under Multiple Displays, select Duplicate Desktop on Display 2. This will mirror your laptop screen's content to the tablet.
On a Mac
- From the Apple menu, click System Preferences, then click Displays.
- Click Arrangement.
- Mark the Mirror Displays checkbox.

Share Tablet Content in Zoom
To annotate content in a Zoom presentation:
- While in a Zoom session, click the Share Screen button in the control bar.
- Click the Advanced tab.
-
Choose Whiteboard.
- Click Share (blue button at bottom right).

You should now be able to annotated your shared content using the stylus on the Wacom tablet surface.
If you have questions or issues setting up or using the annotation tablet, contact the AV support for the teaching space as indicated on the laminated materials in the room.
Calibrate the Tablet
Calibrate the pen to your monitor
To calibrate the tablet or adjust its brightness, use the Wacom One Tablet Properties, part of the software installed earlier.
- In Windows 10, from the Start menu, click Wacom Tablet, then click Wacom Tablet Properties.
- On the Mac, open System Preferences from the Apple menu, then click Wacom Tablet.
- Select the Wacom One from the the Device dropdown list.
- Select a pen from the Tool list, then select Calibrate.
- If you are working with multiple monitors, select the monitor corresponding to your pen display from the dropdown menu.
- Click Calibrate.
- Holding the pen, sit or stand as you normally would when working with the pen display. Use the pen tip to click on the center of the cross-hairs in the upper-left corner. Then click the center of the cross-hairs displayed in the remaining corners.
- Test the alignment by positioning the pen at a few different points on the display.
- Click OK to accept the calibration, or Try Again to re-calibrate.
Adjust Brightness
- In the Wacom One Properties, click Display Settings.
- Adjust the Brightness and Contrast sliders.
- Optionally, make advanced adjustments to your display color settings by selecting one of the following from the Color Setting dropdown:
- Select Color Temperature to make Color Temperature and Gamma options available.
- Select Color Space to make Color Space and Gamma options available.
- Select Custom Color for make custom color settings.
- When done making changes, either click Save to keep the changes or click the Reset Color button to reset your color settings to defaults.
Using the Stylus Pen
- Drawing or signing Press the pen top directly on the tablet surface. The pen is pressure-sensitive and provides a denser color or thicker line the harder you press.
- Moving the cursor While holding the pen slightly above the tablet surface without touching, move the pen.
- Selecting an item Tap in the item once with the tip of the pen.
- Moving an item Select the item, the slide the pen tip across the tablet surface in the direction you would like to move the item.
- Double-clicking Quickly tap the screen twice in the same place.
Change the nib
If the pen’s nib has developed a sharp edge from wear or if it is less than 1mm long, it may need to be replaced.
Contact the classroom unit’s IT support for assistance changing the nib.
Learn More
- Watch the video Getting started with your Wacom One.
- For more about getting started using the Wacom One annotation tablet, visit How to use your Wacom One.
- Full documentation for the Wacom One Annotation Tablet can be found at About Wacom One 13.
Comments?
To share feedback about this page or request support, log in with your NetID