Start a BeyondTrust Remote Support Session via Email Invitation
This article applies to: BeyondTrust Remote Support
This article assumes you and the user have decided to begin the support session by you sending an email message with a link for them to click.
Have you gone over the material covered in our What to Say Before You Begin a Session article with the end user? It is important that the end user is comfortable with the notion of remote access before you begin.
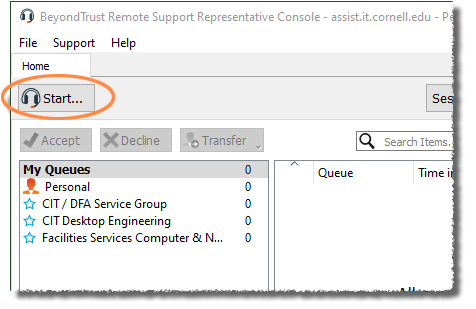
- Run the Representative Console on your computer, logging in with your NetID and password.
- In the Representative Console, click .
- Under Email a Link to a Customer, click .
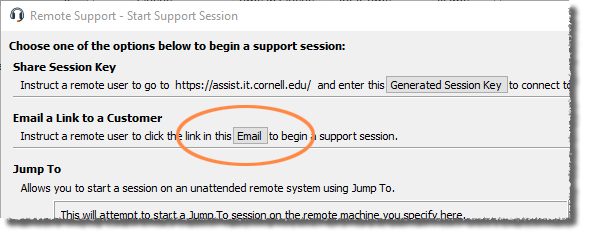
- In the email message that opens, enter their address in the From field and send the message, then click on the Start Support Session dialog box.
- Tell the user “I've just sent you a message with a link. The message will come from me, and have the Subject Remote Support Invitation from me.”
- When the user says they've received the message, ask them to open it and look over the information in the message. Give them a chance to ask any questions about the process. Remember, this is going to be a new and potentially scary thing for some people.
- When they're ready, ask them to click on the link that begins http://assist.cit.cornell.edu/. (There will be other links in the message, pointing them to our support documentation.)
- Since the download and installation of the app differs slightly depending on their operating system and their browser, ask them to describe what they see and walk them through the process up to the point where they see the chat window. Say something like this:
“You should see a small window with a bright orange bar with the word ‘BeyondTrust’ in it. That's our chat window. Whenever I need your permission to do something, you'll see choices it the chat window to or . You'll also see a ‘Stop Sharing’ link. If you click that, our session will immediately stop and the application you downloaded will be automatically removed from your computer.” - You should now see their session listed under either your Personal or Group queue.
- Double-click on their session. Your window will now display the diagnostic tools you can use during the support session. The end-user's chat window will now show that you have begun chatting with them.
- Tell the user that the first thing you're going to do is ask permission to share their screen and access to their mouse and keyboard.
- Click the first icon on the Screen Sharing tab and ask if they see the prompt in their chat window, asking for permission. They should choose .
Before you go any further with your support session, say something like:
“You can see that I can move your mouse, and if you go ahead and move your mouse, you'll see that you still have control over it as well. For the most part, I'm going to ask that you not use your mouse or keyboard during our session, unless I ask you to do something specifically. I've had people try to check their email while I'm working, not realizing that what they do interrupts what I do...”
Comments?
To share feedback about this page or request support, log in with your NetID